8/26/11

Unexpected Blog Break

...due to Lisa's computer crashing!  Sorry...I will get back to you as soon as HP sends my computer back to me.  I'm glad my computer was still under waranty!  I'm also glad I had my hard drive backed up in two places and I didn't lose any of those beautiful pictures and emails that you so kindly sent to us.  Hope to be back soon.

Aloha, Lisa

8/18/11

The Space Time Continuum Kinetic Sculpture is Here!

Space Time Continuum Kinetic Sculpture by Clayton Boyer

Its beautiful Zen-like motion is shown below:

Details, descriptions, and ordering info for the STC are now available at http://www.lisaboyer.com/

8/16/11

Simplicity by Rick Broby

 Simplicity by Rick Broby
Rick emails: "Hi Clayton,

Well here is my finished Simplicity. I made it for my sister who lives in Canada, I used Cherry and Maple wood and made the bob to look like a Canadian maple leaf. Her cabinets are cherry with stainless appliances so I bought a stainless grab bar from Home Depot (the kind you find in the handicapped bathrooms) I cut it in pieces and used it for the weights.
 
 I also made the corner frame supports a little fancier with some fret work.   (Click picture to enlarge and show detail)  It ended up being a lot more work but she was happy with it and it was fun to make.
 
Well I'm not sure which pattern I will tackle next but thanks for this one.

Rick Broby"

Clayton answers:  "And, you cut fancy hands and scrollsawed all those numbers! Beautiful.

It is easy to see that you are an excellent and accomplished scrollsawer. The beautiful scroll work you did on the supports, hands, bob, and dial really set your clock apart.

Thanks for the pix. Your Simplicity turned out both beautiful, and uniquely your own...and it's always nice to hear your sister appreciated your efforts.

Aloha. Clayton"

8/13/11

Toucan by Zach Woods, Age 13


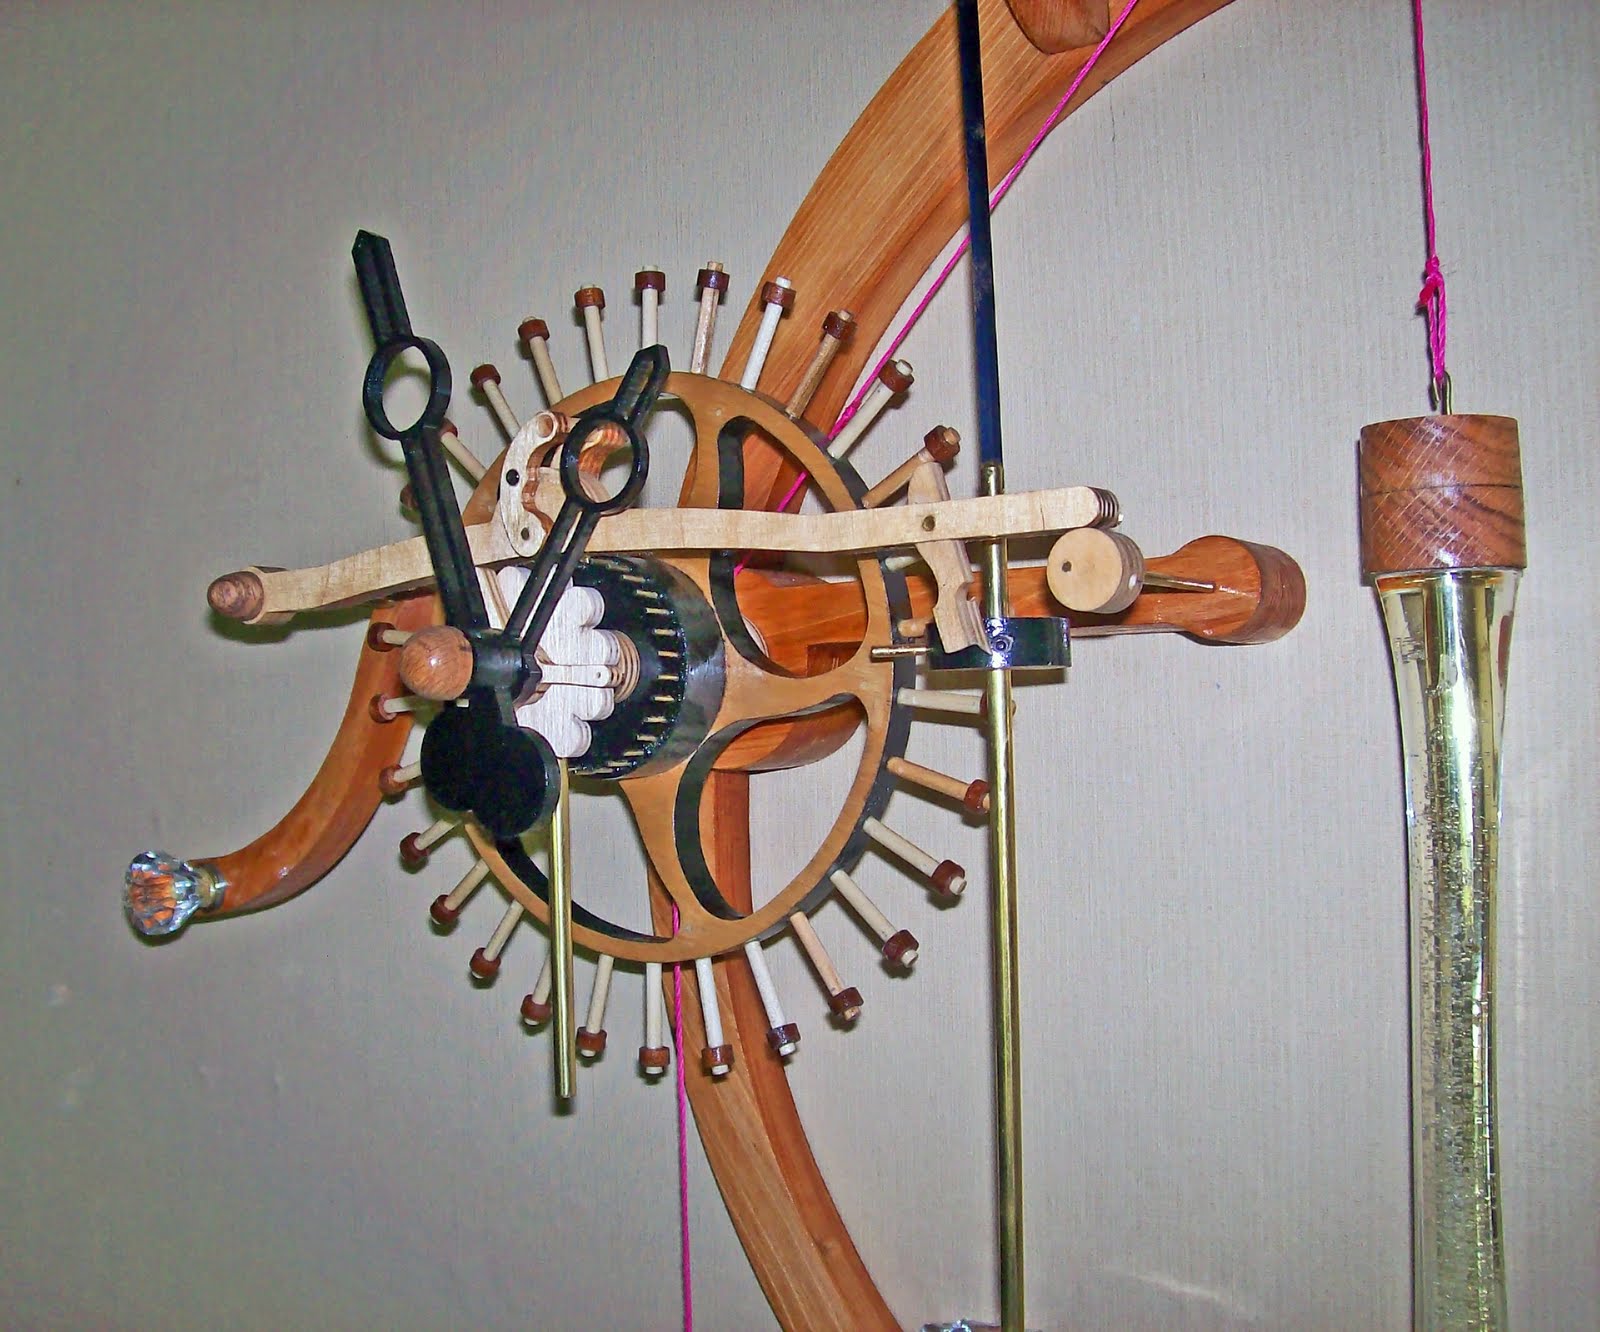
Zach Woods (Age 13!) emails:  "Dear Dr. Boyer, I am pleased to send you these two pictures of the Toucan clock my I just completed with some occasional help from my dad. I am 13 years old and a middle school student in Wichita, Kansas.

I was really inspired by your wooden clock designs and felt I just had to make one or two of them. This one is for my dad's office (if my mom lets him take it out of the house!) and I'm also making a Simplicity design with my Grandpa. Me and my dad are plannning to build many more clocks, like Solaris for my mom and others for my dad's friends.

Thank you for making such cool clock designs, everybody that sees them are very impressed.

Zach Woods"

Clayton answers:  "Thank you for your kind words about my designs, and thank you also for the pictures, Zach. I am very impressed.

You did a wonderful job on your Toucan. I'm also glad to hear you let your dad help a little. I love hearing stories like yours where the family works together to build these wonderful projects. I live in my own Norman Rockwell world in my head, and hearing stories like yours brings me a lot of joy, and wonderful memories of building projects with my own son. Great times.

I hope that you and your grandfather enjoy building the Simplicity, too. You have chosen two very different mechanisms, so you are really getting a great education in wooden clock building, and I am sure your father and grandfather appreciate you letting them be a part of that joy.

Thank you again for the pictures. When my webmaster gets back from vacation we will be posting them to my Flickr' link.

Enjoy the Simplicity build and I'll be looking forward to pictures of that one, too.

Great job on your Toucan!

Aloha. Clayton"

8/12/11

Inclination by Christopher Savold


Inclination by Christopher Savold
Christopher emails: "Hi Clayton!
What a difference 1/64 makes!
I finally found some time to finish off some of my outstanding
projects, one of which was Inclination. I had it about 85% complete
for a year or so and got distracted. I've had it running for about a
month now and it goes non-stop - or at least until the trolley weight
rolls off the incline... ;-)


I had the devil of a time getting it going. As it turns out, once again, I didn't follow your excellent plans very carefully. I drilled 1/16 holes in the pendulum crutch connector rod (or for the laypeople, the little triangle thingy). I wasn't paying attention that the plan called for 5/64 holes instead. Easy mistake to make given that 1/16 pins go into the connector rod. Well, that 1/64 of an inch clearance makes all the difference in the world! Could not get the darn thing into beat for at least a week. It would tick five or six times, slow down and stop. Very frustrating until I realized my mistake with the connector rod. Once I redrilled those holes, I tapped the pendulum once to get it started and it has literally been running ever since.

Thanks again for another great project. Regards,
-Chris"

Clayton responds:  "Well, even with all your tribulations your Inclination turned out beautifully. I'm always happy to see when the builder chooses one of the optional cut-out designs. Very nice!

And, YES!, Inclination is a fantastic runner. Mine (like yours, I hope) has never given me any problems at all. I just wind it each morning (either very early or after 8am because of where the wind hole is located) and she runs and runs and runs.

Glad to hear yours is in that same category. She really is a fine runner, and yours is a beauty.

Thanks for the beautiful pix of your beautiful Inclination.

Aloha. Clayton"

8/10/11

Excellent Tutorial Video Series by Ron Walters, Part One

We are proud to share with you some really great videos by Ron Walters in which he demonstrates experiments he conducted  (on his Simplicity clock plans) with segmented, solid wood wheels, homemade ply and contrasts his homemade versions with purchased Baltic birch ply. These videos contain some really great information for the advanced wooden clock builder who wants to make his own solid wood wheels or wheels from homemade ply.

Note from Lisa:  I will be posting these videos in four separate blog entries, but I will be posting all four entries in one day to preserve the sequential order of the tutorials.  Enjoy!


        Simplicity Variant - Homemade Plywood – Introduction


Excellent Tutorial Video Series by Ron Walters, Part Two

Plywood Clamping Jig - Making Plywood Part 1

Plywood Clamping Jig - Making Plywood Part 2

Plywood Clamping Jig - Making Plywood Part 3

Excellent Tutorial Video Series by Ron Walters, Part Three

Segmented Clock Wheel Part 1

Segmented Clock Wheel Part 2

Comparison Of Completed Clock Wheels - Plywood & Segmented Wood

Excellent Tutorial Video Series by Ron Walters, Part Four

Wood Gear and Clock Wheel Repair - Baltic Birch Plywood


Ron Walters emails:  "Also on YouTube is a recent series on Improved ShopVac Performance and a Cyclone Separator made of wood. Easy to make and it works great. I have used one of these on my scroll saw (it picks up sawdust and the pieces cut out of gear/wheel teeth) and for metal cuttings from my small lathe and mill. I have emptied the 5-gallon bucket several times and haven’t touched the bag in that ShopVac in years. You might find it handy in your shop. A ShopVac isn’t much use if the airflow is choked and the 5-gallon bucket is so much easier to empty than the ShopVac (with or without a bag). 

This is also a construction article on http://woodgears.ca .

Thanks!

Ron Walters
Springfield, MO

YouTube videos listed under: ronaldwalters47

Shop Vac Filters - How To Improve Performance
Shop Vac 5 Gallon Cyclone Separator Part 1
Shop Vac 5 Gallon Cyclone Separator Part 2
Shop Vac 5 Gallon Cyclone Separator Part 3
Shop Vac 5 Gallon Cyclone Separator Part 4"

Great job on the tutorials, Ron!  Thank you.

8/8/11

Radiance by Tim Wilson


Tim Wilson emails:  "Hi Clayton,
Here are the pictures and YouTube video of the Radiance.   What an enjoyable build!

Even though the adjustment factors are critical, it is worth the effort after it comes to life.  I commend your brilliance in designing this clock, and thanks again for the plans.   I did some things a little different in designing the weight and pendulum, and had a idea for the C.W. lever that I saw from a picture from your Flickr Pool at your site.

Kinda a frame motif...hope I did it justice.
 Again, your plans are great and accurate. Off to the Solaris and Marble Strike in the near future.
Have a Wonderful and Blessed day.  Tim Wilson"

Clayton answers: "Aloha Tim, that's just totally great! You caught me so off guard with your creative choice of pendulum weights that I actually laughed out loud! Brilliant!
This is exactly why I love seeing pictures. Of course I always enjoy seeing my designs reproduced exactly the way I designed them, BUT I also LOVE seeing the creativity that other woodworkers put into their mechanisms to personalize them and make the completely unique.
This is a beautiful and creative Radiance. Thank you for doing such a wonderful job on your Radiance and you are right...she is a bugger to get adjusted correctly, but such a wonder to watch when she's running.
Congratulations on yet another successful and creative build.
Aloha. Clayton"

8/5/11

Toucan by Guillaume Marcon


Guillaume Marcon emails: "Hi Clayton!

I send you 2 vidéo : one about my new wooden clock, a TOUCAN a little bit modified to be symmetric and I add a seconds hands. The seconds gears is simply 3 identical gears with a little backside frame.
I wish you enjoy it. The design look like less at the animal calling "TOUCAN"!! But it'll be another clock different...

Thanks for this and I look forward the next!!


The second video is a machine built by myself to execute the coil and to add up the number of meter to spin


ALL THE BEST!

REGARDS!

GUILLAUME FROM FRANCE"

Clayton answers: "Guillaume, that is one beautiful Toucan! You did a wonderful job on your build. The color contrasts between the black and white really make your mechanism POP! Also, that is quite a creative way to add a seconds hand.

But I really have to hand it to you on the machine you made to create your coils and to count the turns. That is pure brilliance and totally Rube Goldberg! What an incredibly creative mind you have!

Thanks for sharing both of those totally wonderful videos.

Aloha. Clayton

8/3/11

A Clock Story to Help Pass the Time (Making a Clock Run Longer; The Jefferson Story)


Waiting for his clock plans to arrive via USPS Mail to Italy (mail to Italy is notoriously and agonizingly slow--can't be helped, sorry), Marco emails:
"Hello Clayton,

Thank you for the list of materials needed to realize the clock. I didn't receive anything yet. Every time I see the postman, I run after him asking if there is something for me, and he always answers "nothing".
Waiting is so exasperating.  Meanwhile I tried to assemble a clockwork, I almost succeeded but I have to wind it up every 8 hours (4.9 foot string and 6 lbs weigh). If you don't mind my asking , I would like to know if there is a method to improve the charge (at least 24h...).

Thank you for being so patient, I'm so happy to talk to such an expert as you are!

Bye, Marco

P.S. Maybe we'll meet one day (even if we live so long way away...) "

Clayton answers,

"Aloha Marco, I completely understand your feeling of anxiousness. I remember the first set of plans I sent away for. The wait was agonizing! Hopefully your postman will greet you with your package very soon. Thank you for your patience.

There are a few ways to make a clock run longer. The most obvious is to hang the clock higher on the wall. That may sound facetious but it is exactly what Thomas Jefferson (U.S. third president) did in his own dining room at his home in Monticello.

Jefferson designed a clock that would run a week on a wind and hung it at the ceiling of his dining room. He then ran the weights down the corners of the room where he had painted on the wall the day of the week. He would wind on Sunday so Sunday was shown in the top corner of the wall. As the weight dropped during the week, it would align with the day of the week painted on the wall.

Unfortunately, Jefferson calculated his radians incorrectly and the clock only ran six days before the weight hit the floor. To solve this problem Jefferson cut a hole in the floor of his dining room and that allowed Saturday to be down in the cellar. (Knowing that the genius of Jefferson occasionally messed up always makes me feel a bit better whenever I screw up a design)

Another way of adding run time is to add another gear at the bottom of the clock's train, but that would require redesigning your clock.

The easiest way in your case is to add a pulley. A single pulley will double the run time - but you must also double the drive weight. Still that would only give you 16 hours run time.

Because your clock only runs for 8 hours and you want to wind it only once a day, your clock would require a combination of pulleys to at least treble the run time. Or you could use a combination, such as hanging the clock higher on the wall and using a doubling pulley.

Rewinding a clock mounted high up on a wall is a bit more difficult - Jefferson brought in a ladder each Sunday to wind his clock. I am presently working on a new clock design with a Huygens Endless Chain rewind system that should simplify rewinding a lot.

For most of my clock designs I recommend stopping the pendulum when rewinding the clock because the force going through the system changes during rewinding and that can affect how the pallets and escape wheel interact. With a Huygens Endless Chain system there should be no need to stop the pendulum when rewinding because the force through the system should remain fairly constant. The big plus is that rewinding time should be decreased dramatically for each clock with the Huygens system.

Please send me pictures of your clock experiment.

Enjoy! 

Aloha. Clayton"

8/2/11

Weird Gears by Steve Johnson


"Hello Clayton,

I have attached a video of one of the projects I made.  I made some of the Nautilus gears and have no problem rotating them either way.

Take care,
Steve Johnson"

Clayton emails:  "Woo! Hoo! Isn't that a fun one!?!?

Thanks for the video. It's always so much fun to see the creativity of other woodworkers, and these Weird Gears really give the artist a huge spectrum in which to demonstrate that creativity - as you have done here.
Is that a 5 rpm motor you have driving your sculpture? Or did you adapt some other kitchen or shop gadget to drive it? I've been thinking about using an old electric can opener to drive some sculptures. They are slow enough to get a good feeling for the movement within the sculpture.
Yours is GREAT! Thanks so much for sharing that. It's always such a joy to see a new mechanism brought into being.

Congratulations.
Aloha. Clayton"