10/31/11

Marble Strike by Rabbit

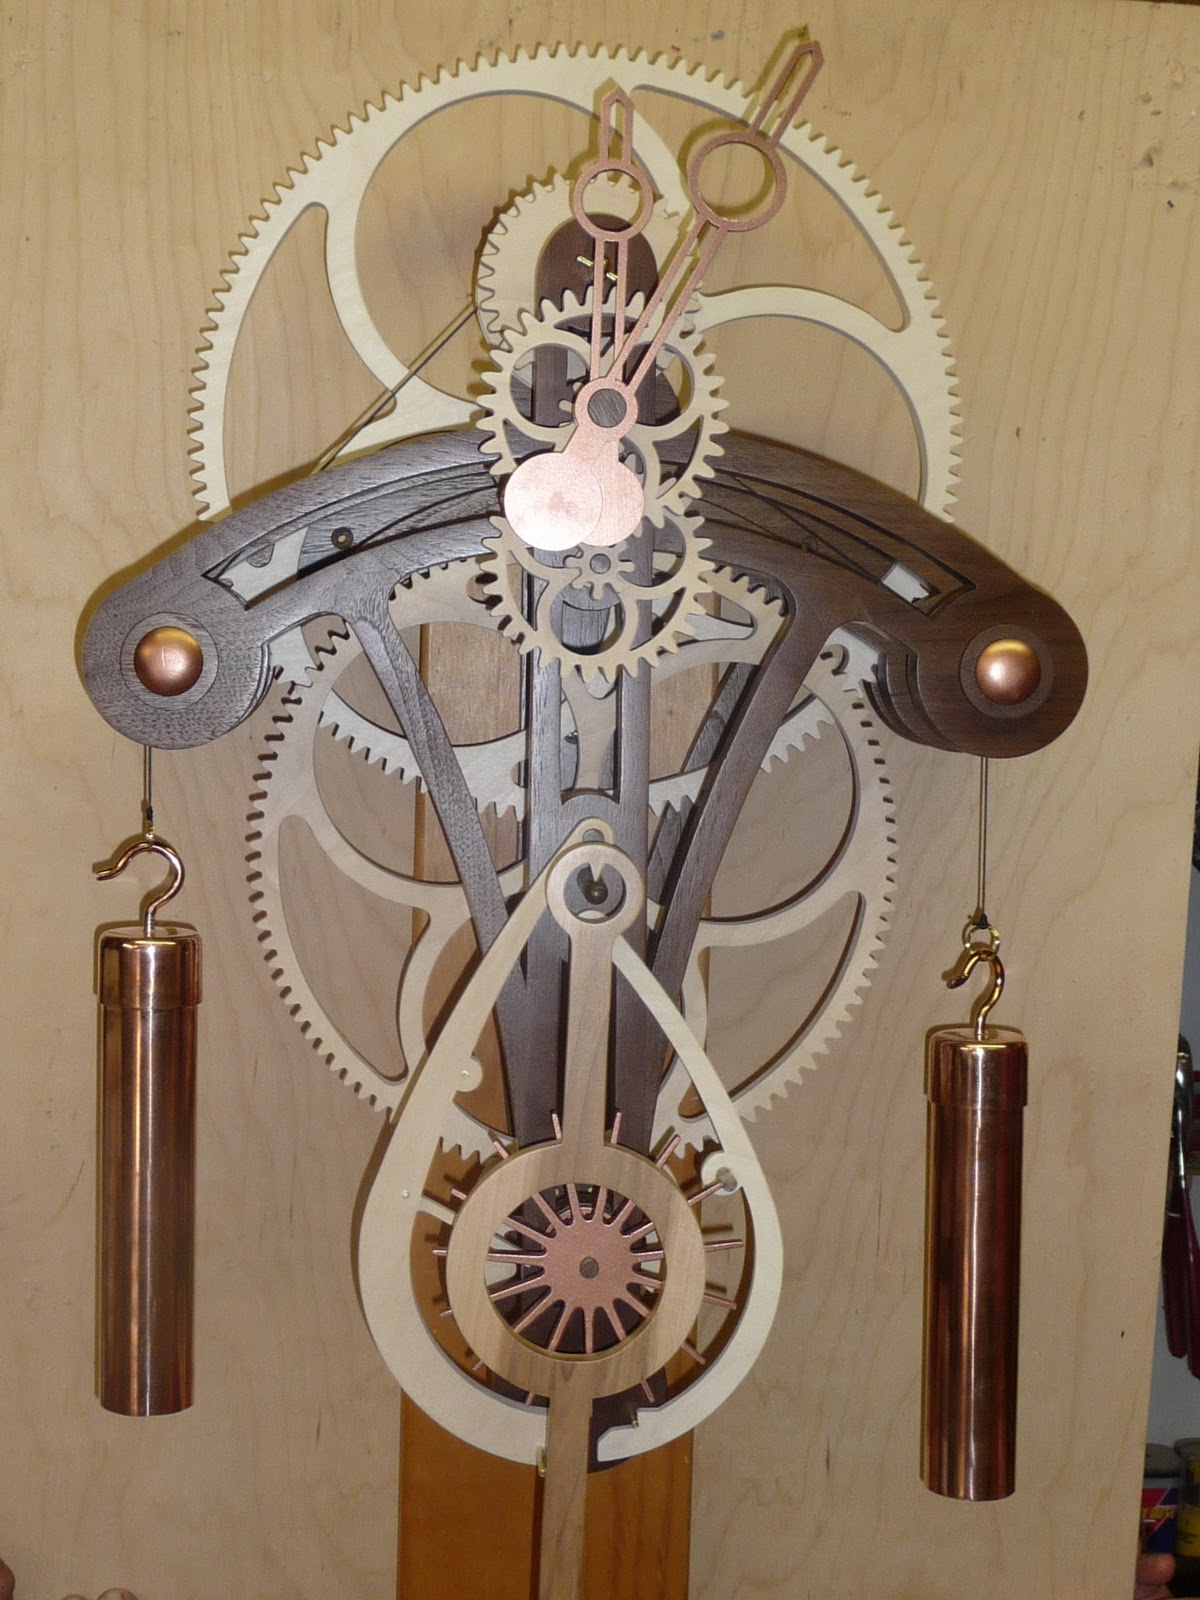
Marble Strike "Steampunk" by Rabbit (click to enlarge for detail)
The amazing Rabbit writes:  "Rube Goldberg meets Christian Huygens - at Clayton's house, for a glass of wine.

- also known as "Steampunk" -

Clayton,

after all the work, and then all that staining, lacquering , painting, assembling, adjusting, adjusting, and adjusting - it works flawlessly. no jumpers, clumpers, stickers or stops; just clunks, dings, whistles, gongs, and a steady tick-tock.

this thing is absolutely insane! it's one of the coolest, and maybe most complicated clocks i've built. it's awesome to watch - and listen. if you pay attention, and count, you can tell exactly what time it is just by listening. it would make a great blind man's clock, but to watch it is priceless. it's always doing something.

thanks again so much for your inspiration....and plans!

- rabbit

p.s. gosh, i wish i could take decent pictures! these just don't do it justice. 'wanna send Lisa to Texas for some "glam shots"? i'll try again when i 'place' it. (where the hell am i going to put this?)"

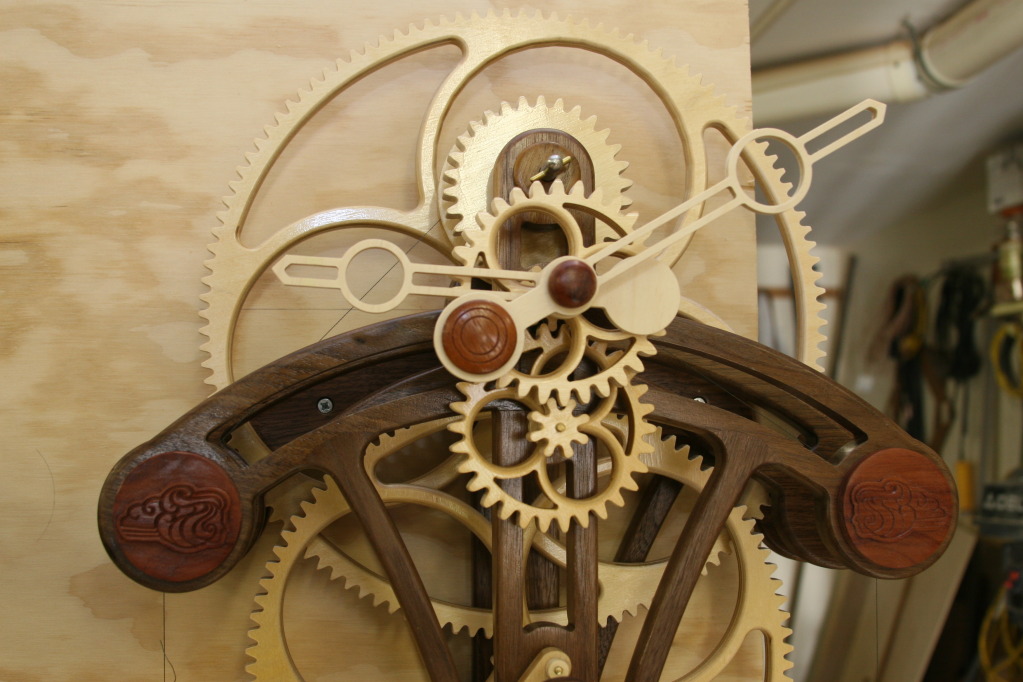
Clayton writes: "Rabbit, your concept for the Marble Strike is absolutely amazing. It is going to take me a while just to figure out how you did what you did. I love that little glass ball in the extremely truncated pendulum.

All I can say is "Wow". What a complex beauty.

Glad to hear you had fun with it. It is obvious that you did - it's hardly recognizable as a Marble Strike!

Congratulations on yet another jaw dropper."

Note from Lisa: Rabbit, I did my amateur best with Photoshop Elements; hope you approve.  Your clock is so gorgeous that the picture quality doesn't matter so much!  Thanks for sharing.  Oh...and about the "Where am I going to put it?" question--you'll have to learn Clayton's technique for sneaking things into the house while I'm at the post office.

10/24/11

Lolli conversion to AC by John Roberts

Lolli conversion to AC by John Roberts
John writes: "Hi Clayton, I hope this email finds you well?

Sorry I've not been in contact for a while, I've been busy with one thing and another, not least making a video about the clock I sent photographs to you before. However, that clock is not yet finished (nor is the video) until the end of the year and I took a little time out to make one for my mother.

I've attached a couple of photographs, which I hope you will find of interest. The clock is powered by an AC synchronous motor and is a passing strike clock. However, because I like to fiddle with things I designed my own 'precision' passing strike mechanism that strikes the bell to within a fraction of a second of the passing of the hour. I also designed a time adjustment mechanism that allows the clock's time to be altered by the turning of a small knob at the back of the clock without interfering with the movement. I also added a strike/silent knob at the front of the clock which inhibits the passing strike mechanism if required.


The entire clock is stained black apart from the adjustment knobs and hands, which were left 'natural' and although I left the wheels and levers unfinished most of the clock has had a layer or two of shellac applied which really brings out the finish.

I hope you like what I have done, and if you would like any details of the 'precision' passing strike mechanism and the time adjustment components then please let me know, they might trigger some fresh ideas but I'm sure they could be improved upon, this is only my third clock to date :-)

Best wishes - John Roberts"

Clayton responds: "John, that's a truly beautiful conversion to AC. That clock would grace any shelf or mantle it was placed upon. This is the kind of creativity I love seeing! Congratulations on a great looking clock.

Yes, I'd love seeing what you did to create your precision passing strike and time adjustment components. I can always do with some 'fresh' ideas (funny though, even the old ones I keep regurgitating don't get too stale).

Thanks for the beautiful pix. You did an absolutely beautiful job.

Aloha. Clayton "

10/23/11

Galileo's Bicycle by Justin Feola

Galileo's Bicycle by Justin Feola


Justin writes:  "Clayton,

Here’s a picture of Galileo’s bicycle complete. I thoroughly enjoyed the build. I’ve been doing carpentry for years and have only done a few “dress-up” projects. Nothing like this however. Man was it fun! I might still stain some of the parts to better contrast with the color of my wall. But for now I’m really happy with it. And, like you said, women love to stare at it, and the guys want to figure it out. They all want one though.

My wife is very pleased and loves it also. Another bonus.

Now…what’s the next build for me? I was looking through and may, in fact, order a set of plans for one of the smaller clocks. I love Toucan but might also go for Wee Willie. I also saw that you might be willing to send plans for Radiance. If that offer is still on the table, I would love those plans.

Thanks again. Your work is great. Keep it up!

Justin"

Clayton:  "Nicely done, Justin! Beautiful work - your craftsmanship really does show in your sculpture...the lighting is really nice too.

Glad to hear you had such a good time building her. That's what it's all about.

The secret path into the Masochist's Corner begins (sigh...censored again by Lisa...) That will take you to the inner sanctum of the MC where you can peruse and order any of the restricted designs contain therein.

Thanks for the pix and wonderful story.

Enjoy

Aloha. Clayton"

10/22/11

An Interesting Email Exchange about Bob Construction...and Fire...and Beer!

 Kaleb Prather has this question for Clayton:

"So my dad and I have been picking away at the Simplicity, and having a spectacular time. I got curious after looking at the parts for the face- how on earth do I drill a 1/4" hole 3/8" deep from the opposite side? Do I just need to overlay another print of the face on the back side to mark those holes, or is there a better way? This build has been a fantastic experience for both of us, and I can hardly wait until our construction lives."

Clayton answers: "Aloha Kaleb, so wonderful to hear you and your Dad are having a great time! That's what this hobby is all about, and I love hearing the stories of families coming together to build these wonderful mechanisms.

Yes, you are correct. You can simply use another pattern and go from the back, or you can drill a little hole (usually 1/16 is as small as people might have) from the front and that will locate where you need to drill the holes in the back. Then a little filler for the 1/16th hole will cover the tiny flaw."

Kaleb: "We are making great progress on the Simplicity, slow but steady. I was wondering if there is a target weight we should shoot for when putting together the pendulum bob. So far so good- this has certainly been a great learning experience. :)"


Clayton: "Bob theory is pretty interesting.

The period of the pendulum is determined by the length of the pendulum, and the length of the pendulum is determined by the pendulum's center of gravity, and the center of gravity is determined in part by the weight of the bob.

So that means that a light bob will simply take a longer pendulum shaft to find the same center of gravity as a heavy bob.


 If you follow my instructions for constructing your bob, knowing a specific target weight is not important because the slight difference between a light weight and a heavy weight can be adjusted for by that little nut on the bottom of the bob.

A light bob will need to be lowered slightly, and a heavy bob will need to be raised slightly to find the same center of gravity and thus the same period for the clock's pendulum.

I probably should, but I don't weigh my bobs. I determine all of my bob weights for any specific clock design by experimentation. Then I write down the instructions for making that particular bob.

Some of my bobs are filled with lead, some half filled, some have BB's instead of lead, and some bobs have no extra weight added at all. They are simply wooden pucks. The length of the pendulum shaft in each plan reflects this.

However if you try to use BB's in a bob that calls for being filled with lead, you'll need to lengthen your pendulum shaft much more than you will be able to adjust with the nut on the bottom of the bob.

Also where you live makes a difference. Whether you live on a mountain top or at sea level will affect where the very same bob needs to be set."


Kaleb: "Wow, bobs are complex little critters. The plan is to empty the lead from some old 12 gauge shells we've got lying around (with care, of course). It sounds like this is within the scope of what's called for, so I will build precisely to plan specification, and adjust as necessary. Thank you for such a wonderful work, designing these clocks. Not only has this project stretched my mind as to what I'm capable of, it has also provided my dad and I some priceless quality time together. I can hardly wait to hear her tick for the first time!"

Clayton or maybe not Clayton or maybe Clayton's lawyer writes: "YIKES! Before you go ripping into shot gun shells (shudder!), wander down to your local tire balancing shop. They have lots of used lead weights that they will probably be happy to simply hand over to you. (Yes, the new bismuth, lead substitute, weights work just fine.)

You have a couple of options with those lead weights. You could snip them into tiny pieces and fit them into the bob's voids, or you could (and as a secret aside...here is usually how I do it) build a separate, sacrificial bob, and with a torch in one hand and pliers holding the lead weights in the other, melt the weights into the voids of the sacrificial bob (wear eye protection, gloves and long pants - lead splatters on bare skin is somewhat uncomfortable).

When the lead cools completely it will shrink a little so you can lift it right out and you can then transfer it to your finished bob. If you do your bob weights this way, you'll find that the wooden sacrificial bob is actually still usable. The lead really isn't hot enough to burn through the wood. The lead will just scorch the wood a little. I have made some bobs using the sacrificial bob as the actual bob. It works just fine.

But since this method involves fire, and molten lead (but hopefully not beer--you know those famous last words..."Hey, watch this! Here hold my beer!"), you didn't hear it from me...right?

Aloha. Anonymous..."


Here are some interesting and/or beautiful bobs we've seen:


Greg Payne's Simplicity Bob


William Ball's Simplicity Bob


Fr. Bedemeyer's Solaris Bob


Gene Collier's Solaris Bob


Gwilym Fisher's Number Six Bob

And finally, Adrian Iredale's wombat bob:

Really - I can't tell which of my designs inspired him to create this Wombat clock - or was he just making that part up?

10/18/11

Ric Paulson and his Number Six

Ric Paulson and his Number Six


Ric emails:  "Hi Doctor Boyer,

As the picture attests,  the Number Six is finished and running. That bag that looks like an IV is my version of a test weight. I’m now in the process of dressing her in Red Oak. Nothing wrong with the Baltic Birch but this is going to someone who requested the oak.

This is actually my third clock, I bought a kit which turned out to be a big mistake. It turned out rather flimsy and although I could get it to run on occasion it spent most of the time at rest. The problem turned out to be simple but makes every build of mine an exercise in modification. I live just outside the city with the highest annual average humidity in the U.S (including Alaska and your home state). Bellingham, Washington has a average humidity of 79.4 %, if it was constant it wouldn’t be an issue but the big swings from day to day cause havoc with the wood. My biggest headache is boring the arbor holes and having a nice tight fit one day and an oversize hole the next. I ended up adding dowel set collars to everything.

Next I built your Genesis from the magazine and although it runs quite nicely for long periods it seems to make up its mind to stop at irregular moments. I suspect the humidity has something to do with it, I just haven’t found time to track down the cause. #6 ran right from the beginning and I didn’t even have to adjust the beat, she seems immune to the humidity.

I’ve enjoyed every minute of the process so far (yes even the frustrating ones) and I’m going to order another plan set just as soon as I finish this message. You are bringing a lot of joy to those of us who wrestle with wood so please keep it up!

Warmest regards,

Eric (Ric) Paulsen

PS: One last thing: I discovered what happened to that old Craftsman scroll saw you had. A company in China bought it and thought that the vibration was a “feature” so they added some more and made thousands of them. I of course bought one, I have since upgraded but I’m not sure when my arms will quit shaking. They must have had some of the “feature” left over because I bought a band saw from the same company and it is loaded with it too!"


Clayton agrees: "You have confirmed what I have also found about the Number Six. It is the best, least humidity sensitive clockworks that I have. It will run, flawlessly, up to about 85%. Then it gets real quiet around here.

Genesis is more sensitive for a couple (or many) reasons. That 60T escape wheel, and the uniframe. The frame would be best made from ply, because I know it's shifting around under all those wheels.

The Craftsman scrollsaw?  I still have dreams that my back teeth are vibrating. No other machine has had quite as significant an affect on my psyche as that one.

BTW, if you should have any interest, you now qualify for entry into the Masochist's Corner...
The secret path begins (this part censored...again! --Lisa). You are now in the inner sanctum of the Masochist's Corner, and may peruse any and all of the creatures that live there...Welcome.

Aloha. Clayton"

10/16/11

A Short Post from Clayton


This morning, via email, I received some of the highest praise I have ever gotten:

"Thanks for your many inspirations. You have truly made it possible for me to become an obsessive, reclusive nut case."

Solaris by Brent Martins

Solaris by Brent Martins

Brent writes:  "Aloha Clayton,

I hope everything is going well for you in Hawaii. I managed to complete my Solaris build this summer in time to give to my sister as a wedding gift. Everyone who sees it is amazed. It took me a couple of weeks to overcome clock withdrawal; I think I was addicted to the little thrill you get when you listen for the clock's beat and are reassured that all is well when you hear it working away. Moving on to new challenges, I am interested in attempting a Radiance build. To facilitate this, I have attached the obligatory picture of my Solaris for your review. Should you find my "demented lack of frustration" sufficient, I look forward to receive the much sought after Secret Link to bring me one step closer to fulfilling my masochistic goals.

Best Regards,

Brent"


Clayton answers:  "Well done, Brent! I love hearing stories like yours. I feel the same way about my clocks ticking away all over my house. My ear picks up that one, out of all the others ticking away, that I had forgotten to wind and had stopped.

Your beautiful Solaris more than qualifies you for membership into that elite cadre of masochistic woodworkers, and the secret path into the Masochist's Corner begins (note from Lisa--SORRY!  Secret path information removed!).

Congratulations, and welcome.

Aloha. Clayton"

10/13/11

Marble Strike by Leonel Leite


Marble Strike by Leonel Leite (click on any image to enlarge)

Leonel writes: "Aloha Clayton,

I send you some photos in large size of "my" Marble Strike, so you can see in more detail what it took me a few months of work! ...


 Give me your opinion about it.

I wish you continued happy holidays.

Aloha. Leonel"

Update 10-22-2011--Leonel has sent a YouTube video of his beautiful Marble Strike clock in action:


Clayton writes: "Leonel! That Marble Strike is absolutely beautiful! Wonderful work, Leonel. You have certainly done the MS plan very proud. Congratulations on creating such a wonderful mechanism.

Thanks for the beautiful pix.

Aloha. Clayton"

10/12/11

Putting Your New Clock into Beat: Serkan Yaliz's Simplicity

Simplicity by Serkan YALIZ

Serkan writes:   "Aloha Clayton,

Hello fron Ankara-Turkey. We had purchased the plans nearly a year ago.
"She" is ticking finally :)

And keeping the time with an error of +1 min per hour. I can tune her up if you have any suggestions.

Looking forward to purchasing new plans from you.   Have a great day.

Serkan YALIZ"

Clayton writes:  "Aloha Serkan, nice to hear back from you.  Thanks for the pix.  It is always nice to see a new clock being put into beat.  They are such wonderful mechanisms, and it looks like yours turned out beautifully.  Your wheels look so clean and crisp!  Nice craftsmanship.

You don't say if she is running fast or slow each hour, but right now it does not matter because during the first four to six weeks it is best just to let them run,and then after that time, after they have 'broken in', make changes.  Some clocks just naturally run fast or slow for a few weeks and then get into their natural beat.

I would guess from seeing your craftsmanship that your clock is running fast.  After the break in period if she is still running fast you can; add more bob weight, lengthen the pendulum shaft, and/or decrease the drive weight.  But a fast running clock is only a testiment to your craftsmanship because it tells me that there is very little internal friction.

If your clock is running still running slowly after six weeks it is a simple matter of shortening the pendulum shaft by 1/2" (12mm) at a time and retest.  Your bob should be in mid position on the threaded rod when you retest.  That way you'll have plenty of adjustment room, up or down, to get your clock into perfect beat. 

Perfect beat for a pendulum clock is about one minute error per day, but remember that will change as the weather changes.

Thanks for the beautiful pictures of your clock that is so happily ticking away over there in Turkey.

Enjoy.

Aloha.  Clayton"

10/6/11

Number Six by Keith Thomas

Number Six by Keith Thomas


Keith writes:  "Dr. Boyer,
I have just finished my #6. I started with all baltic birch but thought it was too "white" so remade the frame out of zebra wood, looks alot better I think.
I just got plans for your Wee Willie clock and noticed your email on the plans so thought I would drop you a line. It looks like it will take a while to make but will be enjoyable. I enclosed a few pics, one is a wood Harley I did a few years ago.
Harley by Keith Thomas (this plan not sold or designed by Clayton Boyer)

I will send pics of my Willie clock when completed. Thanks for the plans, it is an enjoyable hobby.


Keith Thomas"

Clayton responds:  "Keith, I really enjoy seeing the personal touches woodworkers put into their projects. Your Fleur-de-lis hands and beaded dial ring blend nicely with your zebra wood frame.
I was actually glad to see you went with the lighter in weight copper hands on your finished Number Six clock. The wooden ones may have been too heavy with all their "Fleur" out to one side. Imbalanced hands can be difficult for a clock to lift after they leave the six o'clock position. Going with the lighter copper hands was a brilliant move, and they look very nice with your wood choices, too.
I can see with all the woodwork you have on your walls why you didn't want the "white" look of the Baltic birch ply frame for your Number Six. The zebra wood fits nicely into your home. I won't be showing your Six pix to my Number Six though...she'll get jealous and be wanting a new frame.
The Wee Willie really is a fun, and pretty easy build. It is a small clock and accuracy in drilling and cutting is extremely important. I don't usually build more than one of any design, but we liked the WW so much that I built a second one and am presently designing a weight driven, wall hung version.
Very nice to hear you are enjoying this wonderful hobby, and your work really does these designs proud. Thanks for the great pix.
Amazing detail in your Harley sculpture. Congratulations.
Enjoy. Aloha. Clayton"

10/5/11

We Haven't Talked About Those Evil Bushings for a While

Email dialog between Clockbuilder Gene (black print) and Clayton (red print):

Clock builder Gene writes:
"I will admit, I have about come to the end of my rope.  At one point I have had my clocks (2) run for up to 48 hours, non-stop. At that point they were running fast, so I thought I would lengthen the shafts by two inches. So, I cut 2 inches off of the 36.25” and added 4” to the middle of the shaft using a lighter colored wood for contrast. When I tried to restart the clocks neither would run for more than an hour. I have tried every think I can think of to get them to run smoothly again. I’ve polished everything that I can get to hold still.  I have even tried to add brass tubing to the ends of the arbors to act as a bearing. If I turn the wheels by hand they seem smooth as silk. But when I add the escapement and weights and try to start them they will stall after a while. It seems like there is not enough force to turn the escape wheel to the next spook. I tried adding more weight to the Weights. With little or no change.  I tried adding heavier string and more of it to fill the take up spool. Nope…………. No good….. no help.
Question: Do you think that it may have been a mistake to put the brass tubing on the ends of the arbors?
Thank in advance for the help………………………. If you have any extra straw laying around may I borrow some…………….. because I have been grabbing at all the straw that is around here.
Wish I had a video camera.
Gene"

"Aloha Gene,

The answer to your question is:  OMG YES! Any sag of the frame whatsoever will bind the arbors with brass inserts. I think you may have found your problem.

In my very first clocks I put brass bushings - big mistake. Now I NEVER put in brass except possibly at the weight end (but don't even consider using them there either).
When I went to the NAWCC Museum and Library in Columbia PA I saw a 300 year old clock still in running condition that used only metal arbors on wood plates. After 300 years you might want to consider bushing, but I doubt it.

Clayton"

"Thanks Clayton. I thought that the brass bushing with oil would solve some of my problems. But after studying the workings for the last week, the bushing were the only thing I could think off that I might change. Guess I’ll go back, fill the holes and re-drill them. What do you thing would be best to use, water base or oil base filler?


The clocks look nice but if they won’t run for more than 10 minutes, I will never be happy with them. My oldest daughter, Stephanie, tried to make me feel better by saying she didn’t care if it runs or not she just thinks it will look nice to have on her wall. She knows I’m a stickler for detail. And before I will let them leave my shop, they will be right."


"To correct my beginner's error in my first clocks, I went back and pounded in wood dowels with wood glue, and re-drilled. Tricky, but it can be done, and I think you'll be a lot happier with their performance. Drill slowly, in and out, with a Brad point bit because this time you'll be drilling with the grain instead of across it...unless you make plugs! 

"You may be right about the plugs. They would be good and tight and not need much glue. I could make 3/8”plugs using a plug cutter from the same wood as the frame and I think the arbors would be happier in the cross grain. And plug from both sides, where needed. If this works I’ll let you. My wife will tell you that I threatened to burn down my shop with the clocks in it. But now maybe I can wait a week or two."

And later Gene writes:


"Many thanks for your help. You were right about the brass bushings. I plugged the holes with 3/8” walnut plugs and re-drilled then to 9/64” & 13/64”.


I think part of the problem was caused because when I cut these holes on my CNC I was having some feed rate problems with it and the holes were not perfect in size. This time I drilled them using a brad point bit that I had ordered from the internet. I only have to make 6 small shaft caps and I’ll be sending these to their new homes. The shop will seem like something is missing when they go. But off to a new project, Riding my Honda Gold Wing to Montana and Glacier National Park in June.


P.S. I think I have solved the problems with my CNC, the last time I used it ran perfectly.


Thanks again for the plans & the help.


I’ll be BACK


Gene"