12/24/17

The Tea Dipper

New!  Clayton's uber-cute, animal-interchangeable, smile-inducing, tea dipping machine!  Plans available now at www.lisaboyer.com 

Our friend Adrian Iredale has been as busy as a Christmas elf making this hand-cranked version for his family for Christmas Day:

As usual, Adrian did such a wonderful job on his video (and I just love his accent, don't you?), and look at his googly-eyed bear!  Thanks, Adrian, for being the friend and intrepid test builder that you are.  If you like this video, you should check out his YouTube channel, because he's quite the builder of...well...everything!  Watch and be amazed: Adrian Iredale Videos on YouTube

Happy Holidays from Clayton and Lisa Boyer!  

12/23/17

Happy Holidays from Boyer Designs!

New!   The Tea Dipper kinetic sculpture--this is the Holiday Version.  Plans available VERY SOON at www.lisaboyer.com....maybe even today!   Plans available now at www.lisaboyer.com ! The sculpture has a doggie and bear tea dipping version, but we just couldn't resist showing you this silly reindeer version today and wishing you Happy Holidays.

11/27/17

New: Organic Clock

Organic by Clayton Boyer, Wall Mounted Version

Organic built by Bob Brown, Tabletop Version
Clayton's newest design, "Organic" is now up on our website.  Please visit to check out the details and to see them in motion.  A big thank you to Bob Brown for testing the plan, his beautiful work and customizations, as well as photos of his work.  Happy Holidays!

Sneak Peek: "Organic"

Shhhhh.  Still working on the photos and videos.  Soon!

11/27/17  Organic is now up on our website, and the video can be found on YouTube.

8/26/17

Too Short Run Time Troubleshooting

Dear Clayton,  I can only get about 12 hours on a wind, but the (Genesis) clock is accurate to within about 15 sec during this time. I am temporarily mounted about 3 inches low, not enough for 12 hours difference. Any suggestions? Love the clock by the way.
Thanks

Bob

Aloha Bob, congratulations, and I'm happy you love your Genesis.  It really is a little wonder.  So simple, yet such a great runner, and one of my quietest designs.

Things that cause short run time are generally related to how far the drive weight gets to drop before it hits the floor.

The height that the clock is mounted on the wall is of course the first consideration.  The higher it is mounted, the longer distance the drive weight will have to fall.

The length of drive weight itself is important because an extra long drive weight will hit the floor before a short, squat drive weight.

Also if a larger diameter drive pulley than specified has been installed, that will mean the clock will run on less drive weight, but since the circumference of the pulley is much larger, the cord it reels out with each turn will be much greater and thus give us a shorter run time.

BTW, in my book the Practical Guide, I tell a story about how Thomas Jefferson mounted his clock at the peak of the ceiling in his dining room so that he could get an extra long run time.  He ran the drive weight along to one corner of the wall and marked the days of the week on the wall so that his drive weight could also do double duty as a calendar showing the days of the week.  The only problem is that he didn't calculate his drive pulley barrel radians correctly and had to drill a hole in the floor so that weight shows Saturday in the basement.  The clock is still there in Monticello.  This story always makes me feel better when I do my calculations incorrectly.  Ha.

This story tells us that there is another possibility for a short run time - thick drive cord.  The thinner the drive cord, the more turns your drive pulley barrel can handle.  A thick drive cord will take up much more space as it builds up quickly on the drive pulley.  Thus Jefferson could possibly have solved his short run time problem with some thinner drive cord.  Maybe this will work for you, too.

However, considering that your clock is only running twelve hours, when it should be running thirty hours, tells me that something may be slipping inside the clockworks.  Possibly some wheel or connector or pinion did not get glued tightly, or a glue joint has broken.  A slipping joint would allow the weight to turn the gears, but also as it slips the weight will reach the floor sooner than anticipated.

Enjoy!  Clayton

7/8/17

Cutting Small Pieces on a Scroll Saw

Aloha Clayton,

One thought and one question.

Question: How do you cut out such small pieces like end caps without losing your finger tips? The larger pieces are okay but the tiny ones I am not sure how to tackle. Any suggestions?

Thought – it would be helpful if on one page of each plan was listed each piece needed to complete the clock. Right now I just make a mark on each piece on the page that I have cut from wood. It works but I am afraid I will miss something.

Please forgive me if I am being a bother but I don’t know how to contact other scrollsawers about cutting small pieces for instance. I am determined to make Simplicity because it is so beautiful.

Thanks again Clayton.
Scott J

Aloha Scott, nice to hear from you, and I am happy to help.  I also appreciate suggestions from builders.  My whole purpose, since the very beginning, has been to create the most fun, error-free, easy-to-build-from plans humanly possible.

When looking through my plans, the three places that are the very most helpful in finding the location of each individual clock part are the Front View, Side View, and Arbors and Spacers page.  That Arbors and Spacers page shows exactly where each part fits on the rods and tubes, and the Front and Side Views show the overall location of each part of the clock. 

As to how to cut the small parts accurately - I don't.  

For a very small part like a cap I first drill the hole, and then cut the part out roughly, and then take it to the sander and sand that small part to the line.  If it is an especially small cap, I'll cut it out roughly, stick the arbor into the hole and chuck the arbor into a hand drill, and then take that to the sander.  That way fingers do not even get close to the spinning sandpaper.

Also, when it comes to cutting other small parts, such as the pinions, you can use the same philosophy.  The dedendum (the valley between the teeth) should be cut accurately at the scrollsaw, but the outer parts of the tooth (the addendums) can be cut roughly and then finish sanded to the line at the sander.

Here are a couple of pix as examples...notice I am using a zero tolerance insert clamped on the sander's table to keep the small parts from falling between the sander's table and the belt.  #1 in the picture is the dedendum that should be cut accurately.  #2 is an accurately cut addendum, and #3 addendum will be touched up at the sander, and finished to the line.


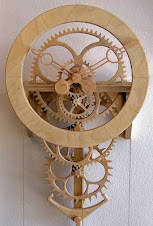
I hope that helps increase the fun of building your Simplicity.  

My Simplicity spent its first five (+) years out in my shop keeping me company as I worked, and getting covered daily with sawdust (a blast from the compressed air cleaned it right out whenever it stopped, but I have to say it was really a trooper and could run through layers of sawdust!).  Simplicity's beautiful song was the first thing to greet me in the morning as I opened the doors.

Then about seven years ago I moved the Simplicity into our living room where it now shares the opposite end of our fireplace mantle with the Zinnia.  They make beautiful fireplace finials!

I hope you enjoy yours just as much.   Aloha, Clayton

2/1/17

Oversized Brad Point Drill Holes Solution

Hello Clayton:

It looks like my 1/4" brad point drill bit is cutting a few thousands oversize.  My 1/4" brass arbors are too loose of a fit.  Have you developed a favorite method of tightening up the fit?


Tim

Aloha Tim, I have noticed that some of the better Brad point drill bits do cut oversized drill holes.  

I have two sets of drills.  One set of Brad points is from Lee Valley, and is what I use if I am going to put a number of pieces on a rod or tube.  This is because those LV bits cut oversized and the pieces to be glued together will be somewhat tight, but still easy enough to slide over the rod for glue-up.  

The other set of Brad points that I use are the cheap Vermont American "Wobble Point" bits (wobble point is not really their name, but the points do wobble.  Ha).  Those are the correct size for a true press fit.

If the fit is somewhat loose, but is not truly critical that the fit is super tight, I simply spit into the loose hole (okay...sissies can use a drop of water) and then the natural swelling of the wood fibers holds the piece to the rod.  

For something that needs a true press fit tightness, and I mistakenly drilled it with the slightly-oversized Lee Valley bits, I simply use epoxy or CA to keep the part in place on the rod.

Enjoy!

Aloha.  Clayton

1/9/17

Timer Program App and Lubrication with Graphite

Simplicity by Christopher Sesco
A short time ago Christopher completed his Simplicity and sent me pictures of his wonderful build.  He was able to get his Simplicity running on 2.2 pounds (1 kg) of drive weight by substantially decreasing the internal friction in his clock, and in his email he describes what methods and materials he used to accomplish that.  Getting a Simplicity to run on such a light drive weight is an impressive accomplishment and a testament to his high level of craftsmanship.  However, in addition, he has some other really exciting information that he wanted to share with all my builders.  Below he describes how he used a free app to get the timing of his Simplicity into a truly accurate beat.

Thank you for sharing the following information, Christopher.  This is a brilliant re-purposing of the Shot Timer app.  Read on to find out how Christopher achieved such accuracy in his wooden clock...


Christopher writes...


I wanted to share with you a few things that have helped me keep her (Simplicity) running smoothly.
First, everywhere there is brass-on-brass contact I have lubricated with dry graphite. 
Next, a friend of mine informed me of a Teflon powder that piano repairmen use on piano keys. I applied a very light dusting to all wood-on-wood contact points. After a short wear in period the clock runs very smooth, on very little weight. 
Lastly,  while trying to set the clock into perfect beat, I utilized a pistol shooting timer program that I had installed on my phone. IPSC Shot timer (android) is a free app, designed for pistol shooters to record shot timing. After setting the microphone threshold sensitivity very low, it is capable of recording clock beats. This program is excellent for using on clocks. Turn it on near the clock and let it run for a moment, paying attention to the 'split time' and result table. This shows me down to the hundredth of a second each beat of the clock. 
Instead of letting her run for a few days and making a fine adjustment, I can set her in near perfect beat within a few minutes. 
It is interesting to see because you can even identify teeth that are slightly different, by slight discrepancies in the beat times. After marking and sanding down a few teeth, the clock runs beautifully.
I highly suggest this approach.


Thank you again, and keep creating your amazing designs.
Sincerely, 
Christopher