6/29/11

Planets Kinetic Sculpture Featured on Rainy Day Magazine


Hi Clayton,

Got the plans! Pretty awesome!!!

Here is the FirstLook article:

Rainy Day Magazine Article (click on link)

Click on any of the images for a larger version.

You are free to link to the article in any fashion you see fit free of charge.

We hope to give the puzzles a try over the July 4th weekend :-)

Will make sure you get the links once they have been posted.

BTW, just saw the pic of the STC...looks great.

Definitely let us know when the plans for that are available!!!

Sincerely,
Wan Chi Lau
Managing Editor
http://www.rainydaymagazine.com
“We Entertain When It Rains”

Aloha Wan, glad you liked the plans, and thank you for such a nice write-up. Great story. You really did a terrific job of explaining how the plans are used, and your layout is absolutely wonderful.

I am also especially intersted in how the Blade Runner works to cut out these mechanisms. I built one a while back and found that the upper support arm, that is the top support for the work, is absolutely necessary for safe, accurate cutting. I first built mine without that and the saber saw was a pretty dangerous weapon, but with the top support in place, it cut nicely. Just couldn't find any blades small (narrow) enough to get a good turn radius that is so needed when making the teeth on the wheels. I am very interested to hear back on how it works for you.

The Planets is a perfect project for a CNC or Laser. Either would make it a quick build...then you can spend your extra time balancing the arms for that smooth but erratic movement (that sounds oxymoronic!)

Also can't wait to see what you do with the plasma ball - whatever that is.

This is what makes this hobby so much fun. The possibilies are endless!

Great job on your article.

Enjoy.

Aloha. Clayton

6/27/11

Lolli by Rodger Marshall--A Spring Driven Variation


Lolli by Rodger Marshall

Rodger writes: "Hi Clayton,

When I built the mystery machine, I ordered some extra springs; just in case. A friend of mine gave me several boards of Purple Heart so I decided to make another Lolli, (my fourth one). I really love that clock. The clock it's self is removable from the frame.


My inspiration for that comes from a Brian Law clock. I also bought some slot car axle bearings for the gear shafts.

You can see that the pallet shaft part of the frame is wider than the conventional Lolli frame to accommodate the width of the bearing. I counter bored the frame just deep enough so the bearings are flush with the frame.


I didn't use bearings for the winding shaft or the hour/minute assembly. For the spring cup, I used a ring of 3"PVC pipe with a cover made of 1/8" Masonite. The key I made from some brass scraps I had in my tool box. I think this is the most beautiful clock I have made. All together I have made eight clocks in three years. Five of them are from your plans. I have included some pictures of this little beauty.

Thank you for making these plans available.

Rodger Marshall"

Rodger, I love it! That took some creative engineering, and you did a great job. That's really a beautifully colored purple heart, and it contrasts so nicely with your dial ring.

You are right on - the spring that drives my Mystery Box is the same spring that drives my Upsy. It is a 30 hour clock mainspring, and should work perfectly in your Lolli conversion.

Congratulations on a great, and innovative build. What a nice little surprise!

Aloha. Clayton

6/25/11

Mwaa Ha Haaaaa! (Wouter Suspects His Simplicity...)

Wouter writes:  "Dear Clayton,

Love your new blog/Tocks

The movies about the Evil twin were funny; loved the reaction people had when the box exploded (some of these people where almost launched themselves into deep space ... )
 
Three or four of these evil twins around the garden/house... and no watch dog is needed anymore ! ;-) .

Makes you wonder if it's allowed to send the drawing around the world ?, did you get a permit for exporting these cunning/devious drawings/plans outside the USA ? :-) .

But one thing concerned me when watching the movie.... the "devious" mastermind behind the setup and filming the response ...

Makes me wonder... are it really clocks we have made ?, or does there come a day that all Dr Boyer clock-siblings over the world wake up and have a secondary function beside telling the time of day ?.

Looking at my wall.... I suspect my Simplicity the most .... , since there were two building variants in the drawings... so which is the evil twin ????

Nevertheless .... I also have interest in building the Space Time Continuum kinetic sculpture.  Could you tell me how i can buy/obtain the drawings of the STC ?.

Greetings from Amsterdam, 

Wouter Stoof"

Note from Lisa--Here's a still shot of the STC Wouter is requesting.  Observant viewers emailed us about it after seeing it moving in the background of the "Evil Twin" reaction video:


And Forrest's "Wheel" Variation:


Plans will be available as soon as we can take her "glamour" video and list her on our website.

6/24/11

Simplicity by Isaac Reid


Simplicity by Isaac Reid


Isaac writes, "Hello,

I would like to buy your plans for the Marble Strike wooden clock. Here are some pictures of your Simplicity clock that you designed, that I built as a gift for someone. I truly enjoyed this project. I have been working on a couple more clocks since to give away.


Simplicity by Isaac Reid, Detail (Click on pictures to enlarge).


I was looking through your site again about a week ago, and found your Marble Strike clock. I have visited the site everyday since just to look at it. It truly is a masterpiece and the coolest clock I have ever seen.

I realize the Simplicity is your simplest clock design, but I was hoping I would still qualify to buy the Marble Strike plans. Here are a few images of one of the my completed clocks. You can also see a video on Youtube here.

Thank you for designing these incredible clocks.

Sincerely,

Isaac Reid"

Wow, Isaac! truly beautiful job on your Simplicity. Your woodworking skills and craftsmanship are certainly displayed in glorious fashion. I also liked seeing that you used the braided line for the weight cord. That's my favorite too because there's no twisting of the weights that can happen with monofilament.

Yes! The Marble Strike is a magnificent machine. The Marble Strike was a long time in the coming. It's been in R&D, I would estimate, about five years. I would design a little, run into a snag, and put it on the back burner for a while. Then sometime later my Subconscious Committee members (those are my muse, my 'Blind Monkeys', that feed me little bits of ideas) would give me a scintilla of an idea and I'd start designing a bit more. It is so wonderful to see such a nebulous concept being brought to fruition. John and Landon are the two builders that helped so much in making this plan available.

You certainly qualify for membership in the Masochist's Club - an association of elite wooden clock builders, and we welcome you.

The secret path into the Masochist's Corner begins (note: info removed for blog post--Lisa) From the pix you sent of your Simplicity, I know you will do the Marble Strike proud. I hope you enjoy building the Marble Strike as much as I have enjoyed designing it.

Your work is truly beautiful.

Enjoy!  Aloha.  Clayton 

6/22/11

Marble Strike by Ed Poste


Marble Strike by Ed Poste

"Hi Clayton,

I have just hung the clock at the front entrance so that as you enter the first thing visible is "The Clock!"  In my haste I hung the clock and started it and took pictures...but forgot the marbles! As mentioned in an earlier email I elected to hang a stainless tube cut to a specific length to create the musical note "B".

I am happy with the tone and resonance and it can be heard throughout the house.
Woods used were Kamagong for the dark wood (similar to ebony wood) and Gmelina for the wheels.


I just received your plans for "Radiance" and my wife thinks I am nuts! She loves all of the designs but hasn't yet grasped the addiction that is wooden clock building.

Warmest regards,

Ed Poste"

Ed, you've done it again! You've created yet another spectacular clockworks. Your Marble Strike is a beauty, and your kamagong's figure is amazing. Beautifully done! I also like the brass arbor caps and I see you've done away with the marble incrusted counterweight for the daisy, and instead used a brass plumb bob that fits with your interpretation nicely.

Your work always makes me smile. Nice work, Ed.

You'll enjoy building the Radiance and it'll be an easy project after the Marble Strike. It's quite a simple build...it is the multitude of adjustments necessary to get her running properly that moved her into the Masochist's Corner. However, when she is running correctly, she's a mesmerizing sight.

Thanks for the beautiful pix, but, actually, I want to see more! Please send me more with the marbles included.

Aloha. Clayton

6/20/11

An Observant Viewer


"Dear Clayton,

I enjoyed your "Evil Twin" video and watching the people's reactions. It reminds me of a time, while I was covering electricity with my physics students, the students wanted to see if a Layden jar could hold its charge over the weekend. So we charged one up, set it in the back of the classroom with a sign that read "Experiment in progress, do NOT touch". As luck would have it, my next were a group of freshmen and one boy saw the sign and, as is typical with curious minds and disregard to instructions, he touched it. There was a flash of light, a yelp, and he jumped back quite some distance with a tingling arm for part of the day. I think it would be neat to set your "Evil Twin" at some location (ie. on a counter at some store) with a sign that reads, "Do NOT touch the lever" and film people's reactions.

Also, while watching your video, I noticed a couple of things. I was interested in how you have your workshop setup. Any chance you could give us a "tour" of where you work your magic on your blog?

I also noticed some of the things hanging on your walls. Do you have a collection of David Roy's kinetic art pieces? There is one thing hanging on your wall that I haven't seen before. In the video from about 10 seconds to about 1 minute, and at the very end, there is a large dark circular wheel (with white segments arrayed around it) in the lower right (beside a clock and under 2 pieces that look similar to David Roy's designs). Is that a clock or a kinetic art piece? Any chance you could showcase that?

I'm really enjoying following your blog. I've been taking an computer design class this past week and have shown everyone in my class your website. I have a guy in my class, who just purchased a 5-axis CNC machine who has been generating some interesting designs...he's taken a strong interest in your website.

Keep up the good work. Next week, I may actually have some time to get in my basement and get some things done. :-)

Have a great day!
Dwight"

Aloha Dwight, you have a good eye. I was introduced to David Roy's work back in the 1970's, and have had some email communications with him. He is an absolute mechanical genius.

I try very hard not to step on David's toes which is why you only see a couple of my own unique kinetic scuplture plans offered on my site. He's a great guy and I wouldn't want to infringe upon his territory.

I do not follow his work because I don't want my designs to be influenced by what he has produced, but coming up with something that David has not already created is very close to impossible. I've designed a few mechanisms I thought were unique and then showed them to friends, only to get in response "That looks like David Roys (_______Insert name here___)". Dang!

The kinetic sculpture you see spinning on my wall next to the Simplicity Variant is called Zinnia. I thought it was unique until I showed it to my clockster buddies, and they were correct, the drive mechanism is not the same, but the display wheels could be nearly direct copies of one of David's sculptures (Dang!) - so I do not offer plans.

I do, however, have plans for the kinetic sculpture in the lower right, just below the one that looks like a giant monstera plant. The monstera plant sculpture is a variant of one of David's sent to me by a dear friend. It has a wonderful floating movement, but I don't have it running because it hits the sculpture below - bad planning on my part).

The kinetic sculpture below the monstera is an Original Clayton Boyer design - with a lot of help from Forrest who designed that particular display wheel.

That sculpture is simply waiting for its 'glamour' photos before being posted to my site. I call that sculpture the Space Time Continuum.

My STC has been running in that spot now for about six or seven months. It's actually running right now! It does not run a full day, but must be rewound about every 8 to 10 hours with the display wheel configuration I have on it right now. I wind it just before I go to bed and it's still running in the morning when I enter my shop, so I wind it again. The rewind is super simple; just pull down on the counterweight cord. It takes about two seconds.

The display wheel you see in the video is actually the optional display wheel that Forrest designed, but that wheel will be available in dxf format because it's so large. The display wheel that actually comes on the original STC is a beautifully weird design - from which the mechanism got its name.

The plans are complete for the Space Time Continuum, and if you'd like to order plans contact me again about it and I'll give you instructions on how to get the STC plans. This might be a fun CNC project because the large gear and three options for the display wheel are available in dxf format, PLUS it is a super simple and gratifying build. Like I said, mine has been running six or seven months, and I love watching its motion, and listening to its unique release mechanism. This mechanism does not tick each second like a regular clock but is released and impulses about every twenty seconds! Fun!

Enjoy.  Clayton

P.S.  from Lisa:  Dwight, we'll work on a blog post "tour" around Clayton's workspace soon.

6/17/11

Introducing...EVIL TWIN.

Remember Mystery Box?

It has an Evil Twin.


Unsuspecting victims shown below:


Plans now available at www.lisaboyer.com

6/16/11

Wee Willie by Robert Johns


Wee Willie by Robert Johns

"Hi Clayton,

Sending along some pictures of my Wee Willie build. Wee Willie is a beautiful design and I really enjoyed this project. So what next ?????


Regards,
Bob Johns
Westminster, MD."

Glad to hear you enjoyed your build, Bob. I enjoyed this design, too. So much so that I made a second Wee Willie, and I almost never make a design more than once. This one is such a treat!

Thanks for the great pix. I like how you made it all out of oak. Looks really nice.

Aloha. Clayton

6/13/11

Simplicity by Peter Vennix


Simplicity by Peter Vennix

Peter writes:  "Hello Clayton,

Just a few words to you to tell you that I finished the Simplicity clock.

It’s been a wonderfull time for me, building this clock and discover that I had it in me to make something like this.

Normally I am not much of a woodworker but I am more a greasemonkey, restoring old mopeds and stuff like that.

However I found (old) mechanical clocks always interesting and I have quite a few of them.

And now….I built a beautiful mechanical clock myself and it feels good. I learned a lot doing this and with what I know now, the second one should be more beautiful….Yes I’m planning to build a second Simplicity clock or maybe another of your designs.

This Simplicity Clock is hanging in my livingroom and is running well. It keeps time pretty accurate.

In Europe we have millimeters instead of inches so I had to convert some measurements to millimeters but I pulled it off so it’s no big deal for Europeans to make a clock like this one. Hey,…if I can do it, everyone can.

I send you two pictures of my Simplicity clock and I want to thank you for the drawings and the beautiful design.


Everybody who sees the clock says it’s design is very pretty. And they are astounded when I tell them that I built it myself.

Until next time….. 

Greetings from the Netherlands,

Peter Vennix"


Peter, your friends are right - that is a beautiful Simplicity. And what a nice story! I love hearing how someone without much in the way of woodworking skills is able to create such a beautiful mechanism. A testiment to the simplicity of Simplicity. Most of these mechanisms truly are quite forgiving for the first time builder - as your wonderful Simplicity will attest.

Your Simplicity plans do come with TWO Simplicity design options; the original weight/counterweight design (the one that you built), and the single weight, key wound Variant design, so you always have that additional option now that your skills are finely honed. You are right, your second clock will be much improved over your first attempt, BUT your first hand-built clock will always hold a special place in your heart - and yours really is a beauty. Well done!

Enjoy. Aloha. Clayton

6/12/11

A Frequently Asked Question: What Tools Do I Need?


A reader asks:  "I don't have any woodworking tools. What is the minimum amount of tools required to build one of your clocks?"

Basically there are just four tools needed to build any of my mechanisms:

1) scrollsaw - I use mostly #5R blades,

2) drill press - and get some good Brad point bits. They really are more accurate and do a much cleaner job of drilling wood,

3) sander - I use mainly a 1"bench top belt sander, and

4) Dremel with metal cut-off disc.

Then all you need is a clock plan and you're ready to build!

6/10/11

Toucan by Tim Wilson


Toucan (with added seconds hand!) by Tim Wilson

Tim writes: "Hi Clayton, I finally finished the Toucan. It was a very enjoyable project.   I enjoyed the experimentation (about a week) as we discussed about adding the second hand, it was just a little bit challenging to do some of the modifications that had to be done, but that is what makes this wonderful art of building wood gear clocks enjoyable, frustrating at times, but enjoyable, if that makes sense. Even though the second hand is not outside the hour and minute hand as conventional clocks, I think it turned out pretty good, and who's to say that what we do with wood gear clocks has to be the conventional way of clock designs and the way we build them anyway!! I have included a picture and a link of the clock in action. (Tim's YouTube video shown below:)


I commend you on your plans, very accurate and clear instructions. I got a chance to go thru your site, very informative, especially the blog, the information you give will be very helpful for some of your first time builders. I especially found it interesting about builders wanting to use bushings--glad you are advising them properly, I was a victim of the bushing monster myself at one time and you are dead on with this subject.

I will look forward to building another one of your clocks in the near future; I want to concentrate for a while on my Westminster project. Thanks for sharing Your Great Talent in clock designs and building techniques with the wood gear clock building world...it is very gracious of you.

Have a wonderful and blessed day.

Tim Wilson

P. S THE TOUCAN HAS BEEN RUNNING FOR ABOUT A WEEK AND IS A VERY ACCURATE TIMEPIECE"

Tim, that's spectacular! Your interpretation of the Toucan is absolutely wonderful. You are exactly why I ask for pictures. I love seeing the creativity of other woodworkers, and you not only did a great job of building the Toucan, but have actually improved upon the design with the addition of a seconds hand.

I basically consider myself a 'prototyper'. I'll get an idea that I want to play with, and I figure that if I want to play with it, others would like to play with it too. Most of the really good stuff in my designs actually comes from a collaborative effort with other wonderful builders like Jeff, Adrian, Forrest, John, Bob and Marc...and now YOU!

As you may know, it was Jeff, the electronics genius, that really made the Toucan idea happen, and the concept was proofed by Adrian, and Forrest who both made their own versions of this fun design, and showed that the design was possible to recreate.

I am very happy to hear you found my plans clear and easy to work from. Enjoyment and personal fulfillment is what this hobby is all about, and accurate plans help decrease the frustration level a lot. Thank you for your kind comments.

Your Toucan turned out beautifully, and congratulations on your brilliant addition of a seconds hand. I am impressed and elated by you creativity.

Enjoy.

Aloha. Clayton

6/9/11

Simplicity Tips: Mystery Dowel, Internal Friction, Wind Cord, etc.

A helpful exchange of emailed information for beginning clockmakers.  My responses are in red.

Hi Clayton,

I've been working on Simplicity for a while and I have a quick question - on page 13, the crutch. I don't understand the "drill 1/4" and glue in 1/4" wood dowel." Can you explain a little further please?

This is my first scroll saw or woodworking project, so it's great to have gotten this far. I have all the pieces cut and sanded to where the line just disappears. I just have to cut the rods and start assembly.

Thanks!

Paul Jozefek

Aloha Paul, you are not the only one. I get a question about that Crutch about two or three times a year.

The 1/4" dowel is simply glued into place cross grain to help prevent splitting of the Crutch when the Allen Screw is screwed in, and to give the Allen Screw some cross grain to 'bite' into.

That dowel helps prevent splitting of the Crutch and stripping of the hole by the Allen Screw.

Be sure to send pix when you get yours completed. I always enjoy seeing the creativity of other woodworkers.


Hi Clayton,


I finally finished Simplicity and I attached pictures. This was my first woodworking project of any kind, so it's pretty basic. I stumbled across your website one day and knew I had to build some of your clocks. I bought a scroll saw, drill press, disc sander, etc, and began to build. I cut one practice wheel, and everything else went directly on the clock.

When I first got it running it stopped every ten or fifteen minutes. There was one tooth that was sticking. I sanded it down and the next try it ran for about 13 hours and stopped. I assume the clock has too much friction somewhere. I did sand a few more teeth, and hopefully that will help some. It's been running all day, for about 11 hours now, so I'll know soon. Are there any common problems that I should be aware of? The good news is that I plan to bring it to my office, so I only need it to run during the day. Unfortunately I work in Manhattan and take the train to work. I'll bring it slowly. The weight shells one day, the pendulum another, and finally the clock. I'll have it packed well, so hopefully they'll be no problems. My company just moved to new offices and we had all the outer office walls made of glass, so everyone will see it.

I bought your Modern Times and Solaris plans, so I'll attempt Modern Times next. Solaris is my favorite of all your clocks, so I can't wait to get that far.

Thanks for creating such amazing designs and plans.

Best Regards,
Paul Jozefek

Great story, Paul, and your Simplicity came out great(!) - especially for a first time woodworking project.

When a clock runs for 13 hours straight, you're there! There's just a little internal friction somewhere. A good way to "break in" a clock is to pull off the pallets and just let it freewheel for a few winds. That should help remove any tiny bits of internal friction that there may be.

You can also lube up your clock wheels a couple of ways; one is to use a Crayon or candle, and just touch it to the pinion while the clock is freewheeling. A little paraffin goes a long way, so don't over do it.

Since there is no finish on your clock, you can also try simply spraying the wheels and pinions with spray silicone. That can temporarily take away a little of the internal friction, too. Had you used a finish, you would want to check to see if the propellant in the spray silicone would damage your finish before using this method.

You could also add just a little more drive weight (or subtract counterweight) and see if that helps.

Modern Times really is a wonderful mechanism. So easy to build, and she is just such a great runner.

Solaris is also my favorite of the two gravity escape clock designs, but the other one, the Model T, is my wife's favorite. Both are really interesting clocks to watch.

Thanks for the wonderful story and the great pix of you Simplicity.

Aloha. Clayton

Hi Clayton,

Thanks for the great tips. Yesterday the clock stopped in the same spot, so I investigated further. It turns out that when I threaded the pulley I got the cord tangled. It would reach that spot and stop. I untangled it and set the clock running before I left this morning. Hopefully it will make it the whole way now.

Thanks again,
Paul

You can do a couple things to correct binding of the wind cord on the wind barrel; one is to gently lift the weight while pulling down on the counterweight. That helps take the tension off of the cord being wrapped around the barrel of the wind pulley as the clock is being rewound.

The second thing you can do is to wax the wind cord. Allow your clock to run down completely and run a paraffin candle or Crayon (of appropriate color) up and down each side of the wind cord a few times to coat the cord. When you have finished, rewind your clock by lifting slightly on the weight and pulling down on the counterweight. The counterweight cord side does not need this treatment.

6/7/11

Ap Brijer's Clocks

Today, I have the pleasure of introducing you to Ap Brijer, who has built several of my clocks. He kindly emailed me with two letters and pictures of his beautiful work and I'm delighted to be able to share them with you now (click on any picture to enlarge):


Model T by Ap Brijer
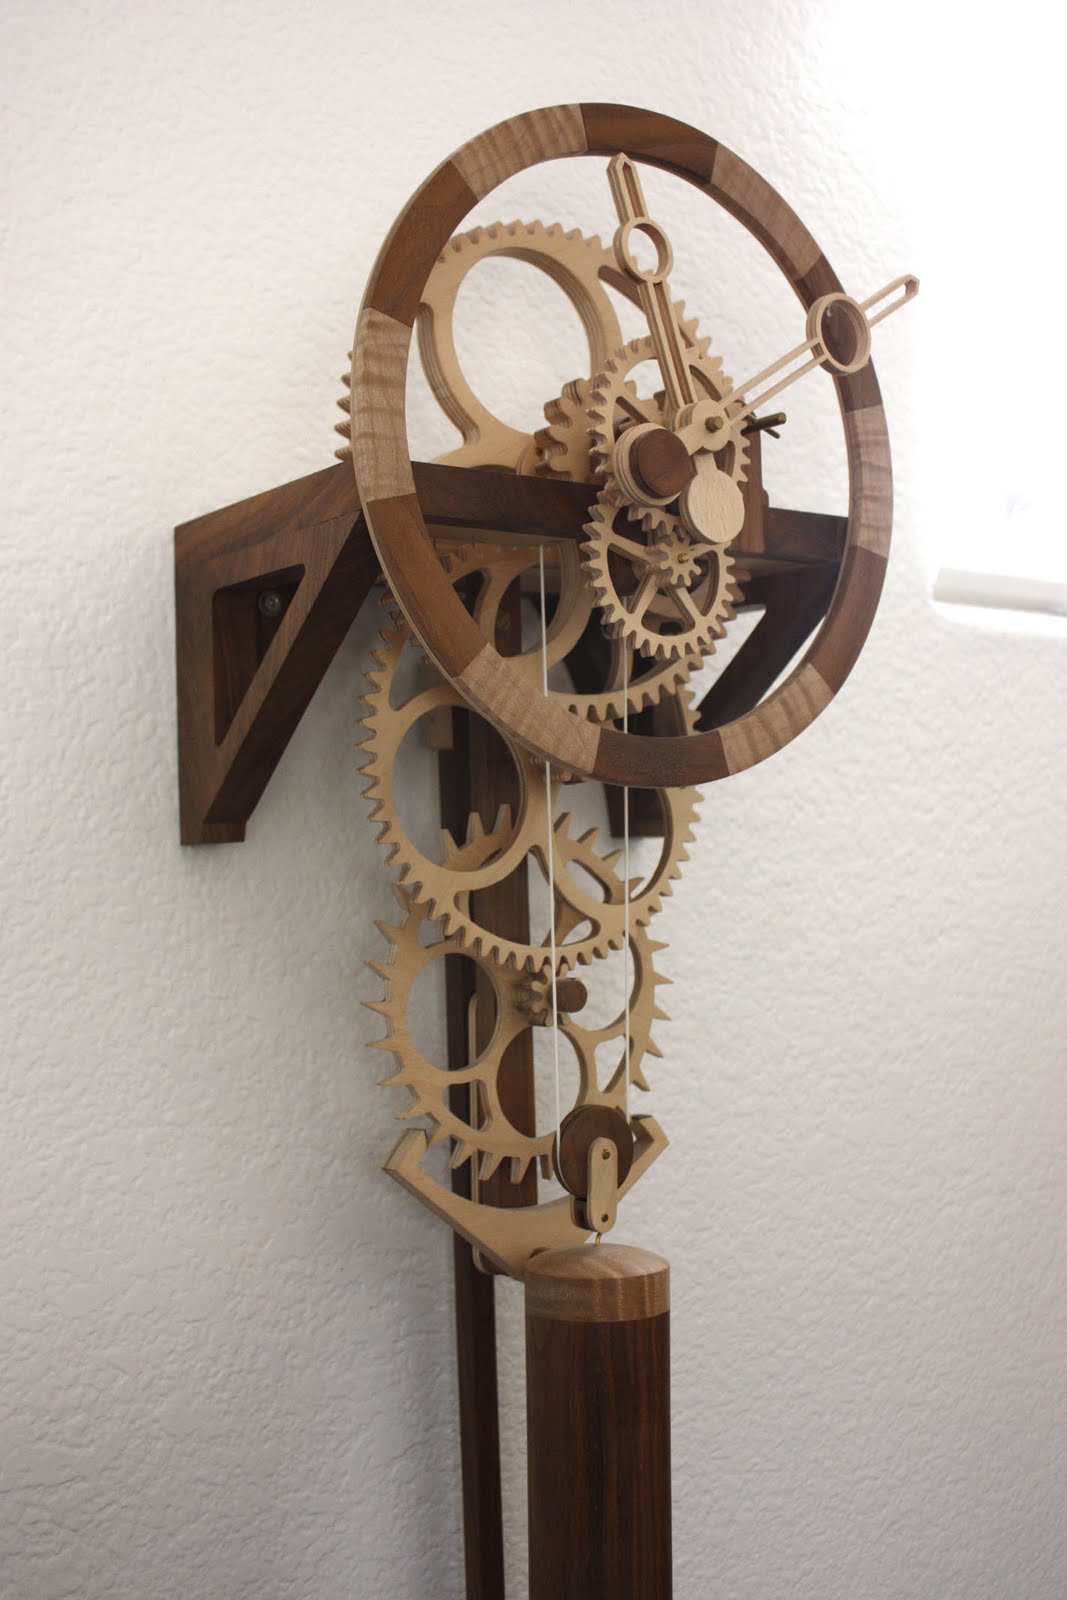

Swoopy by Ap Brijer

Ap writes: "Hello Dr. Boyer, here a message from Ap Brijer out of the Netherlands. I ordered plans Swoopy and the Model T and I want you to see the results. I had some trouble to get the Swoopy running properly but the Model T started running as soon as I put the weight on. I find the escapement on both clocks fantastic and it is very difficult not to look at it.

My sister was looking on your site and she loved your Radiance clock so much that she asked me to order the plans and build it for her.

So I hope that you send me the secret link.

I wish you all the best and I want to thank you for this magnificent hobby.

Didn't know I had it in me ;-)

Ap Brijer" 

I sent Ap the secret link, and three years and FIVE clocks(!) later he writes:

"Hello Dr. Boyer,

Here a message from The Netherlands

I sent you the pictures of my finished clocks.

After making Swoopy and Model T I followed with Radiance.


Radiance by Ap Brijer

I started it at 2008 but I could not get it running so it disappeared in the closet

but this year when i clean out the closet I started again and after making a new escapewheel

(with better tools and a bit more patience ;-)) its now running (still a bit to fast) nicely.

After the very frustrating experience with Radiance I build the Horologium which was very easy

to build and I get a little bit my self-confidence back. So I started to make Modern Times.


Modern Times by Ap Brijer

Again not so difficult to build and its running now a year without any problem.

But then you came with Attempt and I was sold.


Attempt by Ap Brijer


It was a very nice job to build. The only thing that gave me a little headache was the adjustment of the rack.

And then came Toucan. What a fantastic design and being a electrician I have to build this.

Its running, because its electric, very accurate like a quartz clock. I love it!


Toucan by Ap Brijer

And now I'm beginning with a new challenge: Marble Strike.

I think that this hobby is very addictive, I surely can't stop with it.

I wish you all the best,

Ap Brijer"

Here is my return email to Ap:  "Aloha Ap, even with the wonderful design team I have for these mechanisms, I can't keep ahead of your construction! And what a beautiful job you did on all of your clocks, too.

That is one flashy Radiance. Yes, Radiance is probably the most frustrating of all my clock designs because there are so many fine adjustments that must be made to get it running correctly. BUT once she's running, she's an absolute dream to watch go through her gyrations. I can stand and watch her forever - trying to anticipate when she's going to pick up that lever and loose her single wheel.

Yes, the Horologium is a super easy clock, and the Modern Times is not much more work, but what a fantastic runner and so trouble free. I love the subtle colors of your Modern Times.

Man! Your Attempt Striking Clock is absolutely beautiful. You have an amazing eye for color combinations, and your Attempt is "striking" in more than the auditory way. What a beauty!

I didn't know you are an electrician, so that makes your approval even more satisfying. So glad you liked the Toucan design. I can't believe you created yours so quickly! She is a pretty fast build, but you really got yours completed amazingly fast. Yes, she's incredibly accurate, PLUS there never any winding!!!

I look forward to seeing your interpretaion of my Marble Strike. Your craftsmanship is outstanding, and your artistry with colors is truly breath taking. Beautiful job on all of your builds. Thank you so much for all the pictures. You have created such wonderful mechanisms and you can be very proud of all of them. Thank you for doing my designs so beautifully.

Aloha. Clayton

6/3/11

Simplicity by Ken Schade, and Tips on Getting Your Clock to Run


Ken Schade writes: "Dear Clayton Boyer,

I purchased your "Simplicity" plans a few months ago and after finally getting my wife to let me buy a scroll saw, I have finished the plans as you have them. And let me tell you it was so much fun building it, I can't wait to surprise my wife with it...once I can get it to work right. I was hoping you could give me some advice on where my problem might be. Every time I start my clock, it will run for about 3 minutes before the bob/pendulum stops moving. I have sanded all my gears to 400 grit or better. When I blow on the gears they spin just fine without any sign of binding, but as soon as everything is put together it just doesn't seem to work. I was hoping that you'd be able to tell me where to start my trouble shooting.

Thank you so much for your help and I look forward to purchasing your "Toucan" plans. I love all of your designs and I know my wife will too once I show her your site. Still want to surprise her.

Thank you for you time, Ken Schade"

My reply to Ken: Aloha Ken, you have successfully entered the "Tweaking Stage" of wooden clock making. That's the stage where everything looks like it should run, but doesn't.

You state that you have built the Simplicity as drawn and not made any "improvements" to my design (always the first question I need to ask when a clock doesn't run), and you have read over my FAQ's on Depthing (Congratulations!!! Yay!), so those two biggies are out of the way.

Because she runs for three minutes and stops, it is obvious that the problem you describe is being created by too much internal friction and that friction is not being overcome by the drive weight.

You could try increasing the drive weight a bit, but because Simplicity is a beginner's clock, the amount of drive wieght I recommend in the plans is way more than she should actually take to run anyway (mine runs on just a bit less than three pounds).

Another good place to look for your internal friction is where the crutch pin enters the pendulum shaft. That crutch pin MUST move freely but not be sloppy.

The correct setting between the crutch pin and pendulum is if you can just barely slip the corner of a dollar bill in between the two of them. Any more than that and the impulse will not be transmitted to the pendulum, any less and the friction between the pin and pendulum will not allow the impulse to be transmitted.

You also read in my FAQ's about not getting any finish on the tooth surfaces of the wheels and pinions? Finish takes up space between the teeth, and some finishes never dry and are thus sticky, increasing friction dramatically.

Also, be sure that your frame is glued solidly between the Shelf and Back Frame piece so there is no 'tweaking' of the frame when the drive weight is added. If your wheels run freely without the drive weight, and then don't run freely when the drive weight is added, a weak frame is causing the arbors to bind.

I'm sure after you've checked out those places that your Simplicity will spring to life and begin singing her beautiful song.

And I have to get this sage saying in here somewhere... Someone once said, "The sense of accomplishment you experience when it begins to tick is directly proportional to the amount of frustration you had to overcome to get it there." And that's why there is a Masochist's Corner. Some guys just can't seem to get enough frustration.

Enjoy!

Ken responds: "Thank you once again for all the help you have given me in the construction of your "Simplicity" Clock. I have attached a picture of the clock. I know it's not going to be one to really stand out from anything else you've ever seen. As I've built this out of all Baltic birch plywood. But I have to say, it's not bad considering I don't have any educational history in wood working. Everything I've built I've learned by experience or from youtube videos. I love new challenges and I would have to say this project has been one of my favorites.

Ken Schade"


Simplicity by Ken Schade

Aloha Ken, thanks so much for the picture. I really never get tired of seeing pictures of the mechanisms that other clocksters bring into being. You know how some people in hospital nurseries fawn over babies - some as ugly as dirt? The fawners see something different in those kids than normal people who don't need actually medication.

I'm kidding, of course, but the feeling is the same for me. These are my offspring, and I still get a thrill seeing pictures of new little ones being brought into being. My 'wallet' is absolutely bulging with my 'kids' photos. http://www.flickr.com/photos/lisaboyer/sets/72157622224676987/ Fortunately, yours is not as ugly as dirt. It is actually quite a nice clock that will sing her sweet song to you for decades, and you did a great job building her... I say that without even taking my full complement of medication.

It's always nice to hear that you enjoyed building her and that she taught you some new woodworking techniques.

Your Simplicity looks just like mine, and she will always hold a special place in my heart.

You did her proud. Congratulations.

Clayton

6/2/11

Marble Strike by Art Dimock


Marble Strike by Art Dimock (Click on picture to enlarge)

Art writes, "Dr. Boyer,

The Marble Strike Clock -- What can I say? Certainly not as pure as the #6 and nor as graceful as the Inclination, but a unique Rube Goldberg in disguise.

A little more challenging than my previous clocks but still a pleasure to build.  The greatest challenge was finding twelve marbles that were nearly identical in size and roundness. After much sorting and sizing everything seems to operate reasonably well.

Another challenge is the humidity. The northeast U.S. seems like a rain forest this year and I have decided to wait for drier conditions to make any final adjustments.  If I decide to make any more clocks I think it would be a good idea to insert brass tubing in the frame arbor holes to hopefully reduce friction and humidity problems.

Thanks again for professional grade plans.

Art Dimock"
Absolutely glorious! Your Marble Strike is a true beauty, Art.

You've added a lot of very nice touches, like the all wood counterweight, and I see you went with John's acrylic dial ring, and Landon's speed trap. Your woodworking skills are wonderfully displayed.

Beautiful work.

Yes, finding twelve marbles that are exactly the same is a lot more difficult than one would think.
However, about your brass bushing comment...you haven't been reading my blog, have you!?!? There's a ink to it on my mainpage (but I'll give you a hint... NO BUSHINGS!!!)

I don't know what it is right now with guys wanting to put in bushings, but I've recently gotten a rash of emails from guys wanting to add bushings. I've explained in my blog all about how bushings actually INCREASE internal friction. I'm glad you mentioned it before actually doing it.

Thanks for the wonderful picture. I love your interpretation of the Marble Strike.

Enjoy.

Aloha. Clayton

6/1/11

Nautilus by Bernard V


Nautilus by Bernard V  (Click to enlarge)

Wow! Bernard, you are truly an artist. Your Nautilus is beautiful. I love the sun and moon motif you used on your hands as counterweights. Beautifully done. You really did the Nautilus plan proud.

The following exchange from an email correspondence after Bernard sent me this picture of his Nautilus.  My comments and answers to his questions are in red print. 

Bernard writes:  "I have a question concerning fine adjustments on Nautilus' speed. My understanding is that it has a compound pendulum; so if it runs fast one raises the bottom bob and if it runs slow one lowers the bottom bob ( reverse of a simple pendulum)... Am I right ?" What you describe is the correct treatment of a compound pendulum bob, however the Nautilus' pendulum is not a compound. It looks like a compound, but isn't. The upper bob is there only for artistic purposes, which is why I made it small and light.

Nautilus is completely designed using the Golden Mean. Each of her pieces relates to the other pieces by a ratio of 1 : 1.618 or some multiple of that. The upper bob, as well as the other components and 'hangy' pieces are all related by the Golden Mean, even though some of the pieces are only artistic additions and thus superfulous mechanically. "Also, does one also make adjustments to the top bob ( the smaller curved piece at the top of the pendulum which has no lead ball added) ?"  No adjustment to the upper bob is needed.


"I am attaching a picture of my Nautilus taken during testing period; Your can use it as you wish on flicker or your blog ! As you can see, I did some very small modifications; design my own minute and hour hands,"  Your hands are art by themselves! "use some old market weights I had (3.5 lbs on main weight as prescribed and a tiny 5 oz one as counter-weight), and I had that little bell I wanted to use so I re-figured the action of the pivot arm and the counter-weighing of it to make it work ( done thru testing, took a whole day !!!)"   I always enjoy hearing stories about how other woodworkers get to experience the joys of spending all day on a single re-modification. It sort of puts everything into perspecive. Designing is not as simple as it may appear, but the joy at the end when the mechanism is working is unlike anything else, and you've done an amazing job creating your Nautilus. Congratulations!  

"Thank you for your great plans!"  And thank you for creating such a beautiful mechanism.

Aloha. Clayton