5/30/11

Bird Of Paradise by Derek Hugger

Bird Of Paradise by Derek Hugger
Derek writes:  "Hi Clayton,
I'm finished with my first woodworking project ever. Not bad if I do
say so myself ;). I'm having a little trouble keeping it running;
sometimes it goes for several hours (went for close to 12 once), and
sometimes it only runs for 5 minutes. I'm thinking it's just some
friction somewhere. Anyway, thank you again for designing these
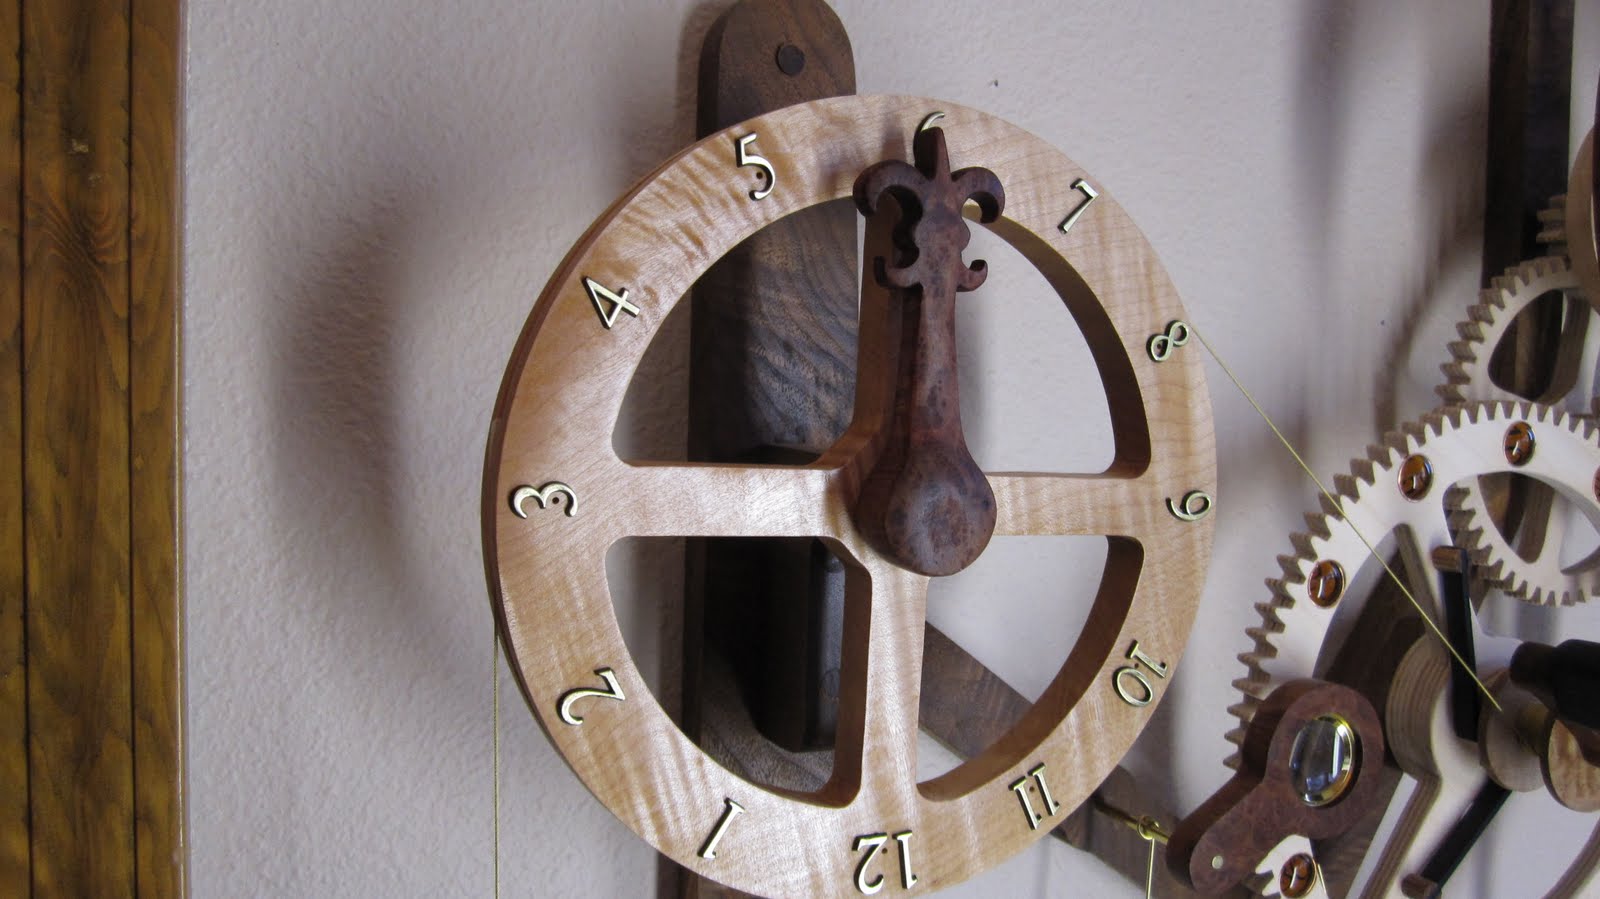
beautiful pieces of art. Nautilus is next for me! Until then, here are
some images of the Bird of Paradise. Throw on some 3D glasses and have
a look!

Best,
Derek"

 Bird Of Paradise by Derek Hugger in 3D!


Yes, Derek, your first attempt at a woodworking project really did turn out nicely. It turned out fantastic!
It is nice to see that you did your frame in a darker wood. I don't think I'll show your pictures to my Bird Of Paradise. She'll just get jealous.
These are the first pix I've ever gotten back that were taken in 3D! I don't have 3D glasses, but I'll be on the hunt for them now, just to be able to see these unique pix you've sent.
If your clock is running sometimes for 12 hours and sometimes for 5 minutes, it could be an internal friction problem, and you might think about liberally spraying everything with silicone spray. (Do not do this, however, if you used a finish on your clock that will be ruined by the silicone's propellant.)
Spray the tooth surfaces of the wheels and pinions, and where the arbors meet the frame, and if that takes care of it, yes, there is a tiny bit of internal friction somewhere. However, more commonly, it sounds like something may be coming out of adjustment, and the most common place for that to happen on the Bird Of Paradise, and on Swoopy is where the Verge screws to the Pallet Arbor.
The Verge is that No-Named thing in the plans that has the red vertical line and the Pallets and Resters attach to.
Thanks for bringing that omission of nomenclature to my attention. I have now properly named the Verge in the BOP plans. Anyway, back to your problem...
Sometimes another Allen Screw up from the bottom of that same hole helps hold the Verge more securly to the arbor.
If these don't fix the problem, read over my FAQ's on depthing, and "Why Doesn't My Clock Run," and tweaking, because I'm sure that a clock that runs sometimes for 12 hours is soon to be a very fine runner for 24.
Aloha, Clayton

5/29/11

Humidity and Pallets: A Solution

Clock builder Rick writes:  "I have built a Genesis clock and have had it running for about three months now. The weather here in WI finally changed and with it comes the humidity. The clock stopped on me. This told me to turn on the dehumidifier. A few days later when the humidity lowered it would run and stop. I would slide the pallets out of the way and the gears would run fine there was nothing in the gear train causing it to stop. I looked at the tips of the pallets and saw that there was a groove wore into the face of the pallet were the escapement wheel made contact. The face of the pallets were cut a little short so to make them longer I added a piece of veneer to make them longer. I used a flat file and then buffed the pallets and my clock is running again. I don't know what type of wood veneer it was but I am going to have to change it to something harder. This is my fourth clock of yours that I have build and I have added veneers to my Number 6 with no problems. I thought are that I have a better idea with the veneer rather then using wood filler but I am not so sure now. Just wanted to get your thought on this. I was going to put this on your blog but I don't know how to get it there.

Thank you for your time and help, Rick"

My answer:  "Aloha Rick, so you've found yet another use for these beautiful mechanisms - an hygrometer.

Yes, here in Hawaii I occasionally use mine for the same reason. It's interesting too that various mechanisms succumb to humidity at different rates. Some (like my Number Six) are real troopers and can run through nearly any weather change, while others stop if I walk by them after I've exercised heavily (eg; Lolli).
I think you are correct about finding a harder wood for your pallets - and also for your escape wheel. Your escape wheel teeth are taking a beating, too. This is actually one of the reasons I recommend baltic birch, or other high quality ply. To put into perspective what it has to go through, a seconds clock ticks 86,400 times a day, which is 604,800 times a week or over 31.5 million times a year!

My Number Six has been running daily, for almost nine years (over 284 million ticks!), and shows absolutely no sign of wear. So to see wear in the first few months points to a problem with the softness of the wood used.

Concerning the soft pallets you are dealing with, I would go ahead and try either the wood putty method that I describe in my FAQ's and/or add a drop of CA glue (Superglue) to each pallet face.

CA really does a nice job of hardening wood surfaces, but also swells the wood a little bit - which Bob used to his advantage...he found that a drop of CA is a great way to decrease the size of slightly oversized arbor holes, or if the caps don't fit tightly to the arbor ends.

You might even think of adding a drop of CA to each of the tooth tips on your soft-ply escape wheel, but you'll probably need to re-round your escape wheel again.

Here is an extreme close-up of my Number Six entrance pallet face:
My pallets are made of high-quality baltic birch ply.  You can see there is a glazing or smoothing where the escape wheel teeth have contacted and run along the pallet face for all these nine years, but absolutely no wear on either the pallet face or on the tips of the escape wheel teeth. Look closely at the tips of the escape teeth and you'll see that they are still sharp and square - not at all rounded by wear.

As you mention, I don't have the comment section of my blog turned on. I also don't answer any comments or questions on any of my YouTube videos. It's just too many places to check for questions each day.

My web page "Contact Me" button is the best place for clocksters to contact me with their technical questions, and some of the more helpful ones may end up being posted to the blog. Be sure to check the FAQ section of my blog first before you email me, though--your question may already be there.

Aloha. Clayton

5/27/11

Letter from Clockster: Clock Design, Run Times and Recommended Reading

Here's an interesting letter thread that covers a few topics you might find interesting.  Builder Neil writes:

"Howdy Clayton,

I'm currently at uni finishing up my masters in Architecture, and in the past I've worked on a few different clocks just as a hobby.

I got most from garage sales that didn't work, and really enjoyed getting them running again...although not all work accurately. but you get that when your learning.

I'm really interested in trying to match my ideas about architecture and my hobby for clocks into one and design a few grandfather clocks for particular buildings and architects.

My big question for you would be, what books did you pick up to learn the art of what you do, or where you trained in clock repairs and then added your love of wood work. If you can think of any good books that might show how the design of clocks is done, do you mind forwarding me the names and authors so that I could have a look through.

Thanks heaps for the time and love the work you do.


Regards,

Neil Brown
Ba. Design (Architecture), UON
Undertaking Ma. Architecture, UON"
My response:
"Aloha Neil, sounds like you've gotten the 'bug' too. It's a wonderful malady.

You can check out my recommended reading section for books. The very best for clock mechanics is Modern Clock. The others there are great, too.

About design, I had two instructors - friends of mine that made a difference in my design. Marc Tovar, (check out his site in my links) said "simply bend a line until it is pleasant," and the other friend, a fabric artist told me once when I was stuck "you are trying to design 'beautiful.'  Design 'ugly.'"  She was giving me freedom from my own constraints.

Good luck in your career and in designing these most wonderful mechanisms.

Aloha. Clayton"
The thread continues from Neil:
"Aloha Clayton,

I've ordered the books you recommended, and I've been instructed that I'm getting them for my birthday so I can't start anything until then.

One question I havent been able to find either on your site, on in any of the others that I've been looking at, is how often do these clocks need to be wound up? Is it everyday, every week, a month. I'm interested in making one for my In-laws, but dont think they would appreciate it as much if they needed to wind it up every morning. It would most likely stop and only be started when they knew I was coming over.

Alternative: what are the designs that yourve made that last longer between winds, or can this be altered easy enough from a beginers point of view.

Thanks again for the advice on the books. Cant wait to get these bad boys started.


Neil Brown"
Last word fom me:
"Aloha Neil, I think you are gonna enjoy those books, especially Modern Clock. It will explain everything about clocks and how they work. Although it is mainly about metal clocks, much of what he writes about will apply just as well to wooden mechanisms.

The length of time between winds, and how long a clock will run on a wind depends upon a lot of things.

The easiest way to make a clock run longer, since it is weight driven, is to hang it higher on the wall. This may sound facetious, but it is exactly what Thomas Jefferson did in his home in Monticello. In his dining room Jefferson designed a clock that mounted at the ceiling, and I believe he wound it each Sunday. As the weights dropped, they would align with the days that were marked on the wall of his dining room. Unfortunately, Jefferson calculated his wind barrel radians incorrectly and a hole in the floor had to be drilled for the weight to drop through and into the cellar to get a full weeks run time. Saturday was in the cellar.

A pulley on the weight cord will double the run time of a clock. A set of pulleys will treble or quadruple the run time, and extra gearing will also make the clock run longer.

Most of the clocks you see on my main page run for a full day on a wind. To get two days run time is not difficult, but getting a clock to run a full week on a wind takes some doing and is generally not for the beginning clockster.

I believe that the only clocks in that 'week run time' genre that I offer are the Medieval Astronomical Calendar Clock and Attempt.

Of course there's always Electra and Toucan that NEVER need winding.

Aloha, Clayton"
Toucan, an electromagnetic clock, built by Jeff Hecht

5/26/11

Horologium by Jay Zollinger

Horologium by Jay Zollinger


"Hi Clayton: It took me a lot longer than it should have, but I have finally finished building an Horologium. Your plans were perfect and I’m very happy with how it turned out. A few photos are attached."

Jay Zollinger"


Aloha Jay, all I can say is "Wow!" Those beautiful woods, the gleaming brass finials and parts, the magnifying glass - everything goes so well together and turned out amazingly beautiful.
That is one magnificent mechanism.
Congratulations.

5/25/11

Tips: How Do You Make the "Planets" Caps? and Nominal Lumber Sizes

Email from a builder:

"Hi, I have a question for making the Planets sculpture:  How did you cut the 1/8 ply caps? They're a little too small for me to be willing to shape on the belt sander.

Also, in case you might want to know, you left 3/4" stock off the materials list (for the spacer between the frame and arms).

After many  pieces flying out of my hands and a few broken parts, I can say that I am almost finished and should have a picture or video for you by the end of the school year."

Here are my answers written in red font:

How did you cut the 1/8 ply caps? They're a little too small for me to be willing to shape on the belt sanderI made my caps by first cutting them at the scrollsaw and then touching them up at the 1" bench top belt sander. A bench top circular sander would work fine here too, but a little secret to keep the caps from falling between that gap between the sander and the sander's table is to clamp a sacrificial scrap of wood closer to the sanding belt.


See the picture above of the sacrificial table attached to my belt sander. You'll be able to see from the picture that it has been sacrificing for a very long time (no, those are not blood stains from getting knuckles too close to the sander).

The next step to either rounding the caps, or in the case of the Planet's design, beveling the caps, is to mount the cap through its center hole to an appropriately sized rod (1/8" in this case). Then mount the rod into a hand drill, turn on the drill, and come at the running sander, at the proper angle, with the rotating cap-on-a-stick.

If you didn't like the sacrificial table idea above, you could round your caps using the cap-on-a-stick idea, too.

In case you might want to know, you left 3/4" stock off the materials list (for the spacer between the frame and arms) Actually it is listed there in the cryptic measuring system known as Nominal Lumber sizes. It is the second entry down in the Materials List where it says "1x4 Hardwood Stock". You'll have enough 1x4 left after making your frame to also make the spacer. Here are a couple of links to help explain Nominal Lumber sizes. As you will see a 1x4 is actually 3/4" in thickness. http://mistupid.com/homeimpr/lumber.htm http://en.wikipedia.org/wiki/Lumber

After many Pieces flying out of my hands and a few broken parts, i can say that I am almost finished and should have a picture or video for you by the end of the school year. It is always exciting when a new mechanism begins to run on its own. Please be sure to send pix when you get yours completed.

Aloha. Clayton

5/24/11

Lolli by Rick Urschel and an Attempt Makes it into the House!

Lolli by Rick Urschel

Rick writes, "...wanted to send a quick update concerning the Lolli clock. She's finally running, like a champ! After several failed attempts of laser cutting the escape and pallets, I gave it one last college try.
The clock now ticks away happy as a clam, and I've gotten several compliments on her. I've attached a few photos for your viewing pleasure (sorry for the grain-y-ness, the photos were taken with my camera phone in a low-light office).

Thanks again for all the cool stuff!!
Rick"
Aloha Rick, and thanks for the pix. Neat to see your beautiful Lolli and hear that you got it running.
I never use my CNC for the escape or pallets. They are too sensitive, and my CNC is too clunky of a cutter. Best to cut those pieces by hand.
In other news, Dave Kosanke's Attempt made it out of the garage and into the living room!  Here's another look at Dave's Attempt in its new home:
Attempt by Dave Kosanke
Dave writes, "Here's some photos of the clock in the house.  The wife claims I would live in my shop if I could and she is probably right.

Dave"

5/20/11

Celestial Mechanical Calendar and Orrery by Dick Scarponi

Celestial Mechanical Calendar and Orrery by Dick Scarponi

"Dear Dr. Boyer--finished the Calendar-works great! Thank you! I will send for marble plans soon-I tried to send my email to moalawikai at yahoo, but it was returned saying you do not have a yahoo account-I hope this goes through. what is the best way to correspond/order plans?

Best wishes,

Dick Scarponi
Arrington,New Hampshire"

Clayton writes:  "Aloha Dick, congratulations on the completion of your Celestial Mechanical Calendar Orrery. You have accomplished a wonderful feat of craftsmanship because...as you mention...it 'works great!' (which is actually what it is supposed to do).

The CMCO really is an amazing celestial instrument. I love being able to sit in my office and by looking over at my wall, see what is happening above me in the Cosmos.

You almost got my tricky email right. Just one letter off. Maybe a Hawaiian translation will help. 'Moa' in Hawaiian means 'chicken'. 'Lani' is 'heaven', and 'kai' means 'by the water'. So the meaning of my email address, moalanikai, is Chicken Heaven by the Water. I'm sure you have heard my Kauai feral chicken friends in the background of pretty much all of my videos.

Congratulations again on the successful completion of your CMCO. That qualifies you for entrance into the Masochist's Club and for the Secret Path into the Masochist's Corner so that you can order the Marble Strike...but, hey, wait...this highly secret and important information may fall into the wrong hands! as this response may be posted to my blog.

I'll have to send you the directions for the Secret Path into Masochist's Corner in another email. It is, after all, an extremely exclusive club of elite and highly experienced woodworkers...and then there's me and Adrian.

Thanks for sending the pix.

Enjoy.

Aloha. Clayton"

5/19/11

Simplicity by Steve Riley

Simplicity by Steve Riley

Steve writes:  "Ah, finally finished! It was a lot of fun. My first wooden gear clock from plans. I did make one from a kit once when I was a kid. It still runs at my parent’s house more than 30 yrs later.

I got it to run on 3.4 lbs of weight. It’s been running for weeks. I’m attaching a picture, and my latest YouTube video (thanks for the nice comments on my first video where it wasn’t complete yet!). Feel free to use these on your site if you wish. It’s oak and Baltic birch plywood. I used a DeWalt scroll saw. This project required much more precision than anything I’ve ever done before, I tried my best to not only make a working clock, but a thing of beauty. I think it came out pretty good.


I already have the plans for Solaris, let the fun begin again!

Steve Riley
Shingle Springs, CA"

Beautiful job, Steve! Your oak framed Simplicity looks fantastic.  I like the way you combined the Simplicity Variant frame with the Original weight-counterweight mechanism. It really came out looking very nice that way.
With the craftsmanship you put into this clock, I'm sure it will outlast even your first kit clock from 30 years ago. You truly did create a thing of beauty, and she should be filling your home with her beautiful song for many, many decades.  Congratulations!

5/18/11

Flying Pendulum by Michael Carter

Flying Pendulum by Michael Carter

"Dr. Boyer,
 
I've attached pictures of my first wooden clock...so far. I must say that this is probably the most enjoyable project i've ever completed. I had a few head scratching moments during the build and learned a lot. One example is that you should NOT use aluminum rods for the arbors...curse you Hobby Lobby. I spent many hours watching that little brass weight zoom around. It took several days before I got it to run longer than 5 minutes at a time. I replaced all of the arbors with music wire...much better... more sanding. Then up to 12 min, then I got some bees wax from my dad and lubed the sticking teeth with that and now FINALLY it will run all night. YES!!! What a rush.
 
The weight shell was its own challenge. I spent most of a day hollowing out a 2" wooden dowel and staining and locating lead shot for fill only to discover that it only weighed 3 pounds when full. In the photos is my third version which I "and my wife" are quite happy with. It's 2 1/2" fence post with caps painted with brass paint and wrapped in wood veneer.


My wife just loves the look of "Radiance" and I hope you would be so kind as to allow me access to the secret link for that set of clocks.
 
By the way you designs are simply amazing. You must be a seriously disturbed individual...lol. Just kidding, thank you for allowing me access to them.

Mike Carter"
 
Thanks for the pictures, Mike!  Great job.  You are now welcome into Masochist's Corner, where you too, can become a seriously disturbed individual.  Try not to whine; it won't hurt...much....

5/17/11

Something Funny

Wee Willie Clock Question

Clock builder Hector asks:  "Is there any way to incorporate a minute hand on the Wee Willie clock?"
Wee Willie Clock by Clayton Boyer

Clayton answers:  "Yes, on the Wee Willie you could run a minute hand off of the wind arbor...only...it would run backwards.
The Wee Willie clock was designed to recreate the technology of the 1300's. The minute hand was not added to clocks for another few hundred years.
1670 is the first year clocks were made with minute hands, but to show you how fast timekeeping technology was moving by then, the seconds hand was added in 1676 - only 6 years later!"

5/14/11

Attempt by Dave Kosanke

Dave emailed a picture of his Attempt clock in its tall case:

 Attempt in Tall Case by Dave Kosanke

Attempt in Tall Case by Dave Kosanke

Attempt in Tall Case by Dave Kosanke

Attempt in Tall Case by Dave Kosanke

Beautiful clock, Dave.  I hope it makes it out of the garage soon!  (Or is that your living room?  Because I wouldn't mind if my living room looked like that at all.  My wife might, though.)

Mystery Box Update

Remember Ken from the post on 5/10?  Here's an update on his internal friction problem:

Ken writes:  "I didn't know about your blog until you pointed it out to me.. Thank you.
 
I polished all the axles and the lantern gear pins at the places that rubbed. Before I polished them, I got 29 revolutions of gear S3, and I just came in from counting 79 revolutions of S3. POLISHING WORKS!!!
 
I noticed you put my note and your response in your blog, too. I think that's a wonderful idea, because we can all learn from each other's questions, as well as both positive and negative experiences.
 
Good work.
 
Ken"
 
Yes, polishing the arbors does work...but, hey! now yours works better than mine!

5/11/11

Modern Times by Brian Addis

Modern Times by Brian Addis

Brian writes that his clock, apart from the clicks of birch plywood, is made of imbuia and the backing disc is pau marfim.
 
He made the plywood by resawing imbuia planks into veneers which were then passed through a thickness planer. The veneers were glued together using slow-acting epoxy.
 
Thanks for sharing your Modern Times, Brian.  Excellent work.  Glad you enjoyed the project.

5/10/11

Internal Friction, Bushings...and Crayons!

Bushings, revisited.  Can brass bushings help with internal friction problems?  This information below pertains not just to the Mystery Box, but to all of my clock plans as well:

Builder Ken writes:

"Good morning.  After recovering from a back injury that delayed work on my Mystery Box, I just finished assembling the gear train. I think it has a lot of friction in it and was wondering if it would be a good idea to put brass sleeves over the axles, eliminating the wood-on-brass rubbing. I also wondered if painting the faces of the gears with melted candle wax would help.

On the other hand, gear S3 turns about 30 times on one winding so I may be worried about nothing.  Any opinions would be appreciated. 

Ken" 

Clayton answers:  "Aloha Ken, Yes, you have a bit too much internal friction in your Mystery Box train. My S3, which is the wheel that drives the Mystery Arm, will return the Lever Arm to the locked position 49 times on a full wind. You might be able to decrease the internal friction by doing a little 'coloring'. A color coordinated Crayon works well to reach in between the tooth surfaces, and is less clogging than candle wax. 

The spring for the Mystery Box is powerful enough to overcome a lot of internal friction, but adding paraffin to the mating surfaces of the teeth can only help as long as not too much is used. Too much paraffin can clog the dedendums (troughs) between the teeth.

Read over the section on "Depthing" in my FAQ's. That depthing process will help with any internal friction problems you may have in any wooden gear project. 

I don't know why it is such a common misconception that brass bushings decrease internal friction. If they did, my designs would have them. 

Brass bushings actually INCREASE internal friction. Read over my blog. I have blogged on just this topic and give some measurements you might find interesting. 

If the mechanism has a very solid frame, such as is in the Mystery Box, one would probably notice little difference with the bushings. However, if there is any sag in a clock frame that has bushings, the internal friction between the arbor and the bushing becomes too great, and the clearances so small that nearly any amount of sag will cause the clock to stop. There's no 'wiggle' room for the arbors running inside bushings.

I did an experiment with my Genesis, which is a Uniframe clock. The wheels of a uniframe clock run on arbors protruding from the back frame. There is no front frame, so frame sag is not an issue.  I made one Genesis with brass bushings inside each of the wheels, and one Genesis with no bushings in the wheels, only holes drilled in the wooden centers of each wheel. The difference was dramatic in the amount of drive weight required. Even eliminating the "sag factor" the bushed wheeled Genesis clock took more drive weight to run it!

Also when you have metal bushings on metal arbors, lubrication is required. NO LUBE is required with metal on wood, although you can safely add a little paraffin into the arbor holes. 

My Number Six has been running daily, faithfully, without a single problem, and without lubrication of any kind (because it has no bushings!) for almost nine years. 

Let me know how the color coordinated Crayon trick works for improving the number of turns you get from your S3.

Aloha. Clayton"

5/9/11

Tempo by Miles Hatem, Questions and Answers

Miles writes:

"Hello Clayton,

I'm finally getting toward the end of building my Tempo (which I bought plans for over 6 months ago, wow didn't realize how long it's been until I actually counted back). But as I noticed on your recent blog, you were talking about not putting bushings on wheels because you design some holes to be specifically oversized.

Along that note, when I was putting arbors into my frame for the first time I noticed that the center wheel arbor (3/16") was loose in the frame. I figured I had messed up and drilled the wrong hole size, but when I went back to check the pattern it specified a 13/64 hole. It didn't make sense to me that the center wheel arbor would be loose, so I drilled the hole larger, plugged it with a dowel, then re-drilled with a 3/16" hole.

Now I'm starting to question if that was the right thing to do. Is the center wheel arbor supposed to be loose in the frame?

I look forward to sharing pictures of the finished product. It's definitely been the most fun woodworking project I've done.

-Miles Hatem"

Clayton answers:

"Glad you read my new blog. Yup, the drill sizes shown are correct. Go ahead and re-drill to the correct size.
Send pix when you get your Tempo completed. I always enjoy seeing the creativity of other woodworkers.
Bob, one of my builder/proofers, just loves his Tempo. He says it's the best design of mine that he's ever built. I hope you feel the same way.
Enjoy.
Aloha. Clayton
PS. I don't think you'll find any mistakes on the plans I sent you. You can build it as shown, and guess what?...it'll run! Yay!"

Miles writes back (and a new Tempo is born!):

"I've finally finished the build!


I decided to make the entire pendulum (actually almost the whole clock for that matter) out of a single 96"x11"x3/4" piece of maple. And since I had one large piece of stock, I took a bit of liberty with the pendulum and made the transitions a bit more flowing. Luckily I had the forethought to add some length to the bottom to account for the extra weight at the top. And, since I had the blended transitions in the pendulum, I went ahead and redesigned the hands to match.


I've had it running for a few minutes at a time, but have some minor stopping issues related to a very slightly bent escape wheel arbor (hoped I could get away with it, but apparently I can't). Also, my counterweight is a bit on the light side (~3lb). I only have it filled with steel BB's, so I'll have to try and find someplace here in California that sells lead. It runs fine if I double the weight even with the bent arbor, so hopefully if I fix both issues it won't give me any trouble at all.


The next design of yours I'm looking forward to building is the Medieval Calendar Clock, though I think I'm going a bit crazy for thinking I can do it. I guess if you throw enough time and frustration at anything you should be able to achieve your goal, right? Anyways, I probably won't get around to starting it for another few months, since I plan on building myself a desk first. So I'll have to get back to you when I'm about ready to start so I can buy the plans.

Thanks for offering these beautiful designs for others to build. I have thoroughly enjoyed building this, and am sure you have heard the same from many, many others.

-Miles"

Thank you, Miles, for sharing pictures of your beautiful work, as well as notes and questions from your journey along the way.

Note:  Miles sent me a video of his wonderful Tempo in action, but I was unable to download it.  So here's Bob Brown's Tempo in motion instead:


5/8/11

Hawaiian Time by Mike Norris

This is Mike's Hawaiian Time clock, and she's a beauty.  (This is Mike's second clock built from my plans; he also built the Number Six clock.)


The Hawaiian Time design is actually the winner of a design contest posed to clocksters. The design was to have three same size wheels in a pyramid shape. Sounds easy, but the pinions are not the same size, and that throws off the symmetry.
Hawaiian Time has an optical illusion. If you look at the frame pages you'll see that the arbor holes are not centered below the caps. This gave me just enough fiddle room to make it look symmetrical when it really wasn't.
Hawaiian Time is also one of my only designs with a seconds hand...in this case a seconds disc. Look right in front of where the pendulum is mounted and you'll see it.
What's next, Mike?  Attempt?  I look forward to seeing what you'll do next!

5/7/11

Weird Gears Projects

Dick Wiley sent me these videos of projects he made from my "Weird Gears" plans.  The first one is called "Snowflake":

And I think every little girl on Dick's Christmas list will want one of these  Swan sculptures: 
"Swan Lake" by Dick Wiley, swan figures and box motif are Diana Thompson's design.  Read Dick's description on his You Tube video for more information.

Thanks for the video links, Dick.  Very nice work.

5/5/11

Paul LaRue's Medieval Astronomical Calendar Clock


Medieval Astronomical Calendar Clock built by Paul LaRue

Amazing.  Breathtaking.  Beautiful.  Thanks for sharing your pictures, Paul.

5/3/11

Clocks Gone Wild

It's always so much fun to see the creative ideas you clockbuilders come up with.  Here's how Alan English customized two of his "Simplicity" clock plans as gifts:
 The John Deere "Simplicity" by Alan English

The State of Texas "Simplicity" by Alan English
Adrian Iredale mentions that this wonderful original design of his was inspired by one of my mechanisms. I am not sure which of my designs inspired Adrian's cuddley, cute Wombat clock, but this thing is so adorable that you simply must take a look at his video.
Really - I can't tell which of my designs inspired him to create this Wombat clock - or was he just making that part up?

5/2/11

The "Toucan" Has Landed

The long-awaited "Toucan" clock plans are now available at www.lisaboyer.com !

Marble Strike by Alain Saintagne

Beautiful job on the "Marble Strike" clock by Alain Saintagne of France. 

Alaine writes:

"Bonjour Clayton,

j'ai bien reçu hier les plan s de l'horloge inclination.
je travail sur les finitions de marble strick je vous joint une photo.J'ai voulu voir le mouvement de l'orloge plus présent et conbiné "simplicityet marble strick et affiné l'ensemble.
bravo pour les beaux modèles d'horloge sur votre site on a envie de toutes les construire."

For those of you who do not speak French (me included), here is the same email translated by "Google Translate."  The translation is rough, but the happiness and enthusiasm come through:

"Hello Clayton

I received the plane yesterdays Clock inclination.
I work on marble finishes strick I attached a photo. I wanted to see the movement of the clock running more present and combination "simplicity and marble strike and refined overall.
Bravo for the beautiful clock models on your site we want to build them all."

Thank you, Alain, for your wonderful pictures and email.

5/1/11

Better Than Whaaaaat? Adrian? Really?

I think my friend Adrian loves his new scrollsaw.

My wife and I love Adrian's videos!  They're witty, informative, well-produced, and funny!  They're better than...uh...say...chocolate cake.

Check out more of Adrian's excellent videos here: http://www.youtube.com/user/adrianiredale